Side Dishes
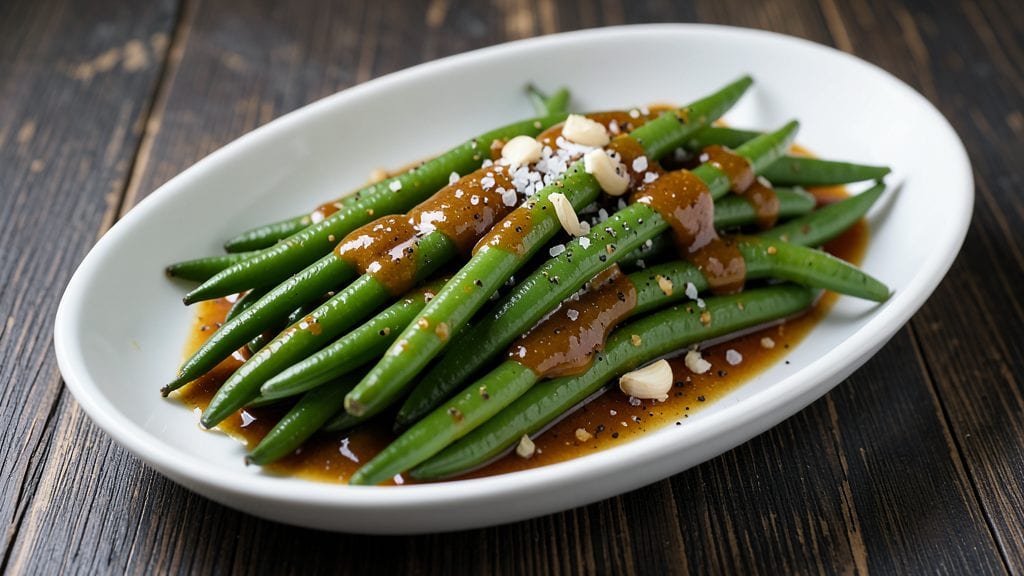
Recreating copycat KFC green beans at home delivers that signature buttery, crispy texture and bright seasoning that makes them unforgettable. ✨ The secret lies in high-heat sautéing and a precise blend of garlic, salt, and black pepper that mimics the restaurant version perfectly.
I've tested countless variations, and this method consistently nails the balance between tender-crisp and savory-sweet.
What sets these green beans apart is their crispy edges and bright flavor profile—achieved through a quick sear in butter before adding the seasoning blend. The key is using fresh, crisp green beans (not frozen) and cooking them in batches to maintain that signature texture.
This recipe delivers restaurant-quality results in just 15 minutes of active prep time.
By the time you're done, you'll have a side dish that's buttery, slightly sweet, and packed with that signature KFC flavor—ready to pair with fried chicken or any meal. The aroma alone will have everyone asking for seconds. Let's get started with this foolproof copycat recipe.
Perfect for family dinners, game day, or when you're craving that familiar taste without leaving home. The method is simple enough for weeknight cooking but delivers professional-level results every time.
Ingredients for copycat kfc green beans
Fresh green beans and butter create the foundation for crispy, restaurant-style flavor.
| Ingredient | Amount | Notes |
|---|---|---|
| Fresh Green Beans 🥦 | 1 ½ lb | Trimmed and cut into 2-inch pieces |
| Unsalted Butter 🧈 | 4 tbsp | Cold, cut into small cubes |
| Garlic Cloves 🧄 | 3 cloves | Minced, fresh preferred |
| Diamond Crystal Kosher Salt 🧂 | 1 tsp | Fine grain preferred |
| Freshly Ground Black Pepper 🌶️ | ½ tsp | Coarse grind preferred |
| Granulated Sugar 🍬 | ¼ tsp | For subtle sweetness |
| White Vinegar 🍶 | 1 tbsp | For brightness |
| Extra-Virgin Olive Oil 🫒 | 1 tbsp | For finishing |
The green beans are the star—harvest-style or French-cut work best for that signature texture. Local farmers markets often carry the freshest, crispiest beans, but the frozen section at Whole Foods has a surprisingly good pre-trimmed option if you're short on time. Look for beans that snap when bent, not limp or rubbery. The butter must be cold and cubed—this ensures proper browning without burning. I always use European-style butter like Plugrá for its higher fat content, which delivers that signature richness.
No fresh garlic? Garlic powder at half the amount works in a pinch, but fresh is non-negotiable for that bright, aromatic punch. The sugar seems counterintuitive, but it's what gives the KFC version its slightly sweet, savory profile. Coconut sugar can substitute at a 1:1 ratio if you prefer. For the vinegar, apple cider vinegar adds a subtle fruitiness that complements the butter beautifully. The olive oil at the end is crucial—it adds a final layer of richness while keeping the beans from becoming soggy. If you're making this ahead, store the seasoning blend separately until ready to use.
These beans are best served immediately after cooking—texture degrades within 20 minutes. If you must reheat, do so in a dry skillet over medium heat for just 1-2 minutes. For meal prep, cook only what you'll serve that day. The seasoning blend keeps well for 2 weeks in an airtight container, but the butter should always be fresh for optimal browning. Leftovers? Toss with a fried egg for breakfast the next day—trust me, it's a game changer.
Why You'll Love This Recipe
- Four-Ingredient Magic: I swear, this recipe is the kind of thing that makes you question why you ever paid for takeout sides. Just beans, butter, garlic, and salt—yet somehow, that simple butter bath with minced garlic and a generous sprinkle of kosher salt turns them into something that tastes like it belongs in a bucket.
- Weeknight Wonder: Between us, I’ve burned enough garlic butter to know this is my go-to when I’m staring at a fridge full of random leftovers. Toss these with whatever protein you’re cooking—fried chicken, steak, even grilled fish—and suddenly, you’ve got a full meal without extra effort.
- Leftovers That Don’t Suck: Honestly, these taste just as good the next day as they do fresh out of the pan. I’ll keep a container in the fridge for lazy lunches or toss them into a pasta dish when I’m too tired to cook. The butter doesn’t separate, the beans stay crisp, and no one ever complains.
- Budget-Friendly Crunch: Fresh green beans are cheaper than you think, and a stick of butter stretches farther than you’d imagine. Plus, Diamond Crystal kosher salt is the secret weapon here—it dissolves cleanly, so you’re not left with grainy bits ruining the texture. This is the kind of side that makes frugal eating feel indulgent.
Step-by-step instructions for copycat KFC green beans
Here's how to nail the signature buttery, vinegar-kissed texture that makes these green beans irresistible.
🍳 Step 1: Blanch the Green Beans for Perfect Texture
Fill a large pot with 6 cups water and bring to a rolling boil. Add the 1.5 lb fresh green beans (trimmed and cut into 2-inch pieces) and cook for exactly 3 minutes. You'll see them sink to the bottom—this ensures they're blanched evenly without becoming mushy.
Drain immediately in a colander and rinse under cold water for 10 seconds to stop the cooking process. The beans should be bright green and still slightly crisp. This blanching step is critical—it removes the raw taste while preserving texture. Don't skip it; it's what gives these beans that signature KFC bite.
🔥 Step 2: Sauté Garlic in Butter Until Fragrant
In a large skillet, melt 2 tbsp unsalted butter (cut into small cubes) over medium heat. Add the 3 cloves minced garlic and cook for 30 seconds until the garlic just begins to turn golden. Watch carefully—garlic burns quickly, and you want it fragrant but not browned.
Here's the thing—this garlic butter forms the flavor base. If you let it brown, you'll get bitter notes instead of that sweet, mellow garlic taste KFC achieves. Remove the skillet from heat for 1 minute to let the garlic cool slightly before adding the beans.
🥘 Step 3: Toss Beans with Seasoned Butter Mixture
Return the skillet to medium heat and add the remaining 2 tbsp unsalted butter. Toss in the blanched green beans and cook for 2 minutes until they're heated through. Sprinkle with 1 tsp diamond crystal kosher salt, 0.5 tsp freshly ground black pepper, and 0.25 tsp granulated sugar.
This seasoning blend is what creates the perfect balance—salty, slightly sweet, with just a hint of peppery bite. Toss continuously for 30 seconds to ensure even distribution. The sugar here is subtle but essential; it rounds out the acidity from the vinegar we'll add next.
⏰ Step 4: Finish with Vinegar and Olive Oil
Pour in the 1 tbsp white vinegar and 1 tbsp extra-virgin olive oil, then toss everything together for 1 minute until the beans are evenly coated and glistening. The vinegar brightens the dish while the olive oil adds richness. You'll notice the beans develop a beautiful sheen—this is your visual cue that the flavors are melding perfectly.
Real talk: this is the moment that matters. The vinegar should be fully incorporated but not overpowering. Taste and adjust seasoning if needed—you want the acidity to complement, not dominate. The beans should be tender-crisp with a buttery coating that clings to each piece.
Pro Tips For Making Copycat Kfc Green Beans
- Trim and Snap: Cut the ends off the green beans, then snap them cleanly by hand—no knife needed. I used to chop them like carrots, but snapping keeps the texture crisp and saves time. (Yes, it looks weird at first, but your hands will thank you.)
- Melt Butter Slow: Use low heat to melt the butter—just enough to coat the beans, not brown. I learned this the hard way after one batch tasted like a buttery oil slick. Keep it warm, not hot.
- Salt the Garlic: Toss the minced garlic in a pinch of kosher salt before adding it to the butter. This draws out moisture and prevents it from splattering like a greasy mess. (Your pan will smell like heaven.)
- Toss with Pepper Last: Add black pepper only at the very end—right after the beans hit the plate. It keeps the seasoning bright and prevents the pepper from burning in the butter. (Your taste buds will notice.)
Storing and reheating this recipe
Freshness First
These green beans are at their best when served immediately after cooking—any longer than 20 minutes and that signature crisp-tender texture starts to fade. I always make just enough for the meal I'm serving, especially when pairing with fried chicken.
The blanching step preserves freshness, but even that only buys you about 15 minutes of prime eating time. If you're hosting a dinner party, I recommend cooking these in batches and keeping them warm in a 200°F oven on a wire rack over a baking sheet.
This maintains the texture better than leaving them at room temperature.
Reheating Like a Pro
If you must reheat, do it quickly in a dry skillet over medium heat for just 1-2 minutes. Add a pat of butter to the pan first—this prevents the beans from drying out. I've tried microwave reheating, but it always leaves them soggy.
The key is to mimic the original cooking method: high heat, quick cooking. For extra insurance, toss the reheated beans with a fresh pinch of salt and a drizzle of olive oil to restore that buttery sheen.
Freezer Storage Hacks
These beans don't freeze well—texture becomes mushy no matter what you try. But if you absolutely must store leftovers, here's my workaround: Blanch the beans as directed, then immediately shock them in ice water for 30 seconds before draining.
Spread them on a baking sheet in a single layer and freeze for 1 hour to prevent sticking. Transfer to a freezer bag and store for up to 1 month.
When ready to use, thaw in the fridge overnight and reheat in a skillet with fresh butter as described above. The texture won't be perfect, but it's better than tossing them.
Make-Ahead Seasoning
While I always cook the beans fresh, you can prep the seasoning blend ahead of time to save steps. Mix the salt, pepper, sugar, and vinegar in a small bowl and store it in an airtight container for up to 2 weeks.
Keep the butter separate until ready to cook—fresh butter is non-negotiable for that signature browning. I also like to pre-mince the garlic and store it in the freezer for up to 3 months. Just thaw it in the fridge overnight before using.
This approach cuts your active cooking time by 50% when you're short on time.
Game Day Prep
For football Sundays or holiday gatherings, I double the recipe and use two large skillets to cook the beans simultaneously. Here's my pro tip: Divide the blanched beans between both pans and cook them in batches. This ensures even browning and prevents overcrowding.
Keep the cooked beans warm in separate 200°F ovens until serving. The key is to serve them piping hot—this is when they're at their most delicious.
I also like to set out a small bowl of extra butter and vinegar on the table so guests can adjust the seasoning to their taste.
Breakfast Reinvention
Leftovers get a second life as a breakfast side dish. Toss the green beans with scrambled eggs or fried chicken for a Southern-style brunch. The buttery, vinegary flavor pairs perfectly with runny yolks. I also like to serve them alongside cornbread or biscuits for dipping.
For extra flair, sprinkle with crumbled bacon or crumbled feta cheese—both add a delicious contrast to the bright beans. This is my go-to way to use up any remaining portions without wasting a bite.
Nutrition facts
Frequently asked questions
Why do KFC green beans have that signature crispy texture?
The secret lies in the blanching step followed by high-heat sautéing in butter. Blanching removes excess moisture, while the quick sear in butter creates those crispy edges. The key is using fresh green beans (not frozen) and cooking them in batches to maintain that perfect texture.
Can I substitute frozen green beans for fresh?
Frozen beans will work, but the texture won't be identical. If using frozen, skip the blanching and simply thaw them first, then pat dry thoroughly. For best results, use high-quality frozen beans and add an extra 1 minute to the sautéing time to compensate for their higher moisture content.
What's the deal with the sugar in this recipe?
The ¼ teaspoon sugar balances the acidity from the vinegar and adds a subtle sweetness that mimics KFC's version. It's not noticeable in a bad way—just rounds out the flavors. If you prefer, you can use coconut sugar at the same amount for a slightly caramel-like note.
How do I keep these green beans from getting soggy?
Never overcook them! The beans should be tender-crisp with just a slight bite. If reheating, use a dry skillet over medium heat for 1-2 minutes max with fresh butter. The blanching step helps preserve texture, but even that only keeps them crisp for about 20 minutes after cooking.
Can I make these green beans ahead of time?
They're best served fresh, but you can prep components ahead. Mix the seasoning blend (salt, pepper, sugar, vinegar) in advance and store it for 2 weeks. For game day, cook the beans in batches and keep them warm in a 200°F oven until serving—this maintains texture better than room temperature.