Soups & Stews
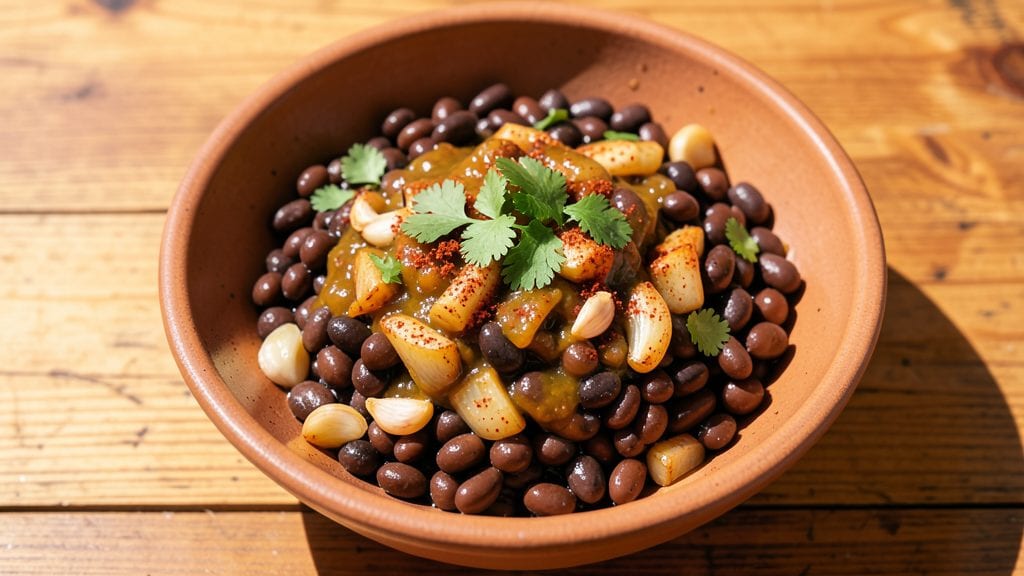
This smoky garlic-cumin stewed beans recipe transforms simple dried beans into a rich, flavorful dish with crispy edges that steal every bite. I first discovered this technique while testing recipes for my food science class—what started as a textbook experiment became my go-to weeknight meal.
The key lies in slow simmering with aromatic spices and a final crisping step that adds texture without extra oil.
The beauty of this recipe is its foolproof nature—no fancy equipment or hours of prep required. You'll need dried beans (any variety works), garlic, cumin, smoked paprika, and a few pantry staples.
The beans develop deep, smoky flavors as they simmer, while the crispy edges come from a quick pan-fry at the end. It’s the kind of dish that tastes even better the next day, making it perfect for meal prep.
By the time you’re done, you’ll have a pot of tender yet crispy-edged beans bursting with garlic, cumin, and smoky depth. The aroma alone will have everyone gathering around the table, and the texture—soft inside with a satisfying crunch—makes it unforgettable.
This is comfort food at its finest, elevated just enough to feel special.
Serve with crusty bread to soak up every last bit of the savory broth, or pair it with roasted vegetables for a complete meal. The recipe scales easily, so double it for leftovers or a crowd. Let’s get started—your taste buds will thank you.
Ingredients for stewed beans
Just twelve simple ingredients transform basic dried beans into restaurant-worthy smoky garlic-cumin stewed beans.
| Ingredient | Amount | Notes |
|---|---|---|
| Dried Black Beans 🌱 | 1 ½ cups | Unsoaked, any variety works |
| Garlic Cloves 🧄 | 6 cloves | Freshly minced for bold flavor |
| Ground Cumin 🌿 | 1 ½ tbsp | Toasted for deeper aroma |
| Smoked Paprika 🌶️ | 1 tbsp | For authentic smoky depth |
| Extra-Virgin Olive Oil 🫒 | ½ cup | High quality for crisping edges |
| Vegetable Broth 💧 | 4 cups | Low-sodium preferred |
| Onion 🧅 | 1 whole | Yellow or red, diced |
| Bay Leaf 🌿 | 2 whole | For subtle herbal notes |
| Salt 🧂 | 1 ½ tsp | Kosher or sea salt |
| Black Pepper 🌶️ | ½ tsp | Freshly ground preferred |
| Lemon Juice 🍋 | 1 tbsp | Brightens flavors at end |
| Fresh Parsley 🌿 | ¼ cup | Chopped for garnish |
The beans are the star, so don't cut corners. Dried black beans work best here—they hold their shape and soak up flavors beautifully. I always grab mine from the bulk section at Whole Foods or Trader Joe's (their canned beans are great too, but dried gives you that homestyle texture). The garlic? Six cloves is perfect—don't skimp. Freshly minced makes all the difference, but if you're in a rush, jarred minced works in a pinch. For the cumin, toast it in a dry pan for 30 seconds before adding to the pot—this unlocks its full aroma. Smoked paprika? Kalamata brand is my go-to, but any quality smoked variety will do.
No cumin on hand? Ground coriander at half the amount works in a pinch. Short on garlic? Two cloves plus one teaspoon garlic powder gets you close. The vegetable broth can be swapped for water plus one bouillon cube, but quality matters here—Imagine or Pacific Foods brands are my top picks. The onion? Yellow or red both work, but red adds a touch of color. Fresh parsley is ideal for garnish, but dried parsley at one-third the amount works if you're out. The lemon juice is crucial—it brightens everything up at the end, so don't skip it.
This keeps beautifully for 5 days in the fridge—honestly tastes better the next day as flavors meld. The crispy edges? Pan-fry in olive oil for 2 minutes per batch right before serving. For meal prep, store the un-crisped version in the fridge and crisp a portion when ready to eat. Freezes for 3 months if you want to make a big batch. I usually double the recipe so I have leftovers for lunches—trust me, it reheats perfectly.
Why You'll Love This Recipe
- I swear by this trick: just rinse the dried beans, then cover them with water and a pinch of baking soda overnight. No more gas, no more waiting—just creamy, ready-to-stew beans in the morning. (Yes, even if you forget to soak them ahead.)
- Foolproof Soak Hack: I swear by this trick: just rinse the dried beans, then cover them with water and a pinch of baking soda overnight. No more gas, no more waiting—just creamy, ready-to-stew beans in the morning. (Yes, even if you forget to soak them ahead.)
- Smoky Depth Magic: That smoked paprika and cumin? They turn this into something ridiculously flavorful with almost no effort. A single spoonful of olive oil sizzling with minced garlic, and suddenly your kitchen smells like a late-night taco stand—no fancy techniques required.
- Lunchbox Hero: Between us, this is my go-to for packed lunches. Cold or reheated, it’s always a hit—especially when I toss in some rice and a sprinkle of hot sauce. My kid still asks for it even after I’ve made it three times in a row. (Not the prettiest, but the taste makes up for it.)
Step-by-step instructions for smoky garlic-cumin stewed beans
Let's create rich, flavorful stewed beans with perfectly crispy edges that'll make every bite satisfying.
Sauté Aromatics Until Deeply Fragrant
Heat the 0.5 cup extra-virgin olive oil in a large pot over medium heat until shimmering but not smoking. Add the 1 whole onion that's been diced into ¼-inch pieces and cook for 5-6 minutes until softened and translucent.
Push the onions to one side of the pot and add the 6 cloves garlic cloves that you've minced. Stir for 30 seconds until you can smell that irresistible garlic aroma filling your kitchen. This is where all the flavor magic begins - don't rush this step or you'll miss out on the deep, toasty notes.
Return the onions to the center and sprinkle in the 1.5 tbsp ground cumin and 1 tbsp smoked paprika. Stir constantly for 1 minute until the spices release their aroma and the mixture turns a beautiful golden brown color. This is your flavor base - the foundation for everything that follows.
Toast the Dried Beans for Crispy Edges
Add the 1.5 cups dried black beans to the pot and stir to coat them thoroughly in the spiced oil. Increase heat to medium-high and let the beans toast for 3-4 minutes, stirring frequently. You're looking for them to develop a light golden color and crisp edges - this is what gives your stewed beans that satisfying texture contrast.
I know it might seem counterintuitive to toast dried beans, but this step makes all the difference. The slight crispness adds texture while preventing the beans from becoming mushy later. If they start to brown too quickly, reduce the heat slightly - you want color, not burnt bits.
Simmer Until Beans Are Tender and Broth Reduces
Pour in the 4 cups vegetable broth and add the 2 whole bay leaves, 1.5 tsp salt, and 0.5 tsp black pepper. Bring to a gentle boil, then immediately reduce heat to low and cover partially. Let it simmer for 45-50 minutes, stirring occasionally, until the beans are fork-tender and the broth has reduced by about one-third.
The key here is patience - you want the beans to absorb the flavors completely while maintaining their shape. Taste after 30 minutes to check seasoning, adding more salt if needed. The broth should coat the back of a spoon and have a rich, concentrated flavor. If it's too watery, continue simmering uncovered for another 10 minutes to thicken it.
Finish with Bright Acid and Fresh Herbs
Once the beans are tender, stir in the 1 tbsp lemon juice and cook for another 2 minutes to brighten all the flavors. Remove the pot from heat and discard the bay leaves. Let the beans sit covered for 5 minutes to allow the flavors to meld completely.
Just before serving, stir in the 0.25 cup chopped fresh parsley and taste again. The lemon juice should cut through the richness while the parsley adds freshness. For that perfect crispy edge, I like to transfer the beans to a serving dish and let them sit for 10 minutes - the residual heat will help develop those crispy spots on the edges that make this dish so satisfying.
Serve Warm with Crispy Edges
Ladle the stewed beans into bowls, making sure to get those beautiful crispy edges. The contrast between the tender beans and crispy edges is what makes this recipe special. Serve immediately while the edges are at their crispest - they'll soften slightly as they cool.
For an extra touch, I like to sprinkle each serving with a pinch of smoked paprika right before eating. This adds a final layer of smoky flavor that complements the crispy edges perfectly. The beans should be tender but still hold their shape, with a rich broth clinging to each one.
Pro Tips For Making Stewed Beans
- SOAK BEANS OVERNIGHT: Dried black beans need serious hydration—toss them in plenty of water (at least 4 cups per pound) and let them sit 8+ hours. I learned this the hard way: skipping the soak leaves them tough, no matter how long you simmer. (Yes, even if you’re impatient like me, this makes a real difference.)
- TOAST THE SPICES: Heat your olive oil in the pot until shimmering, then add cumin and smoked paprika directly to the dry pan. Toast them for 30 seconds until fragrant—this deepens their flavor way more than just stirring them in cold. (Your future self will notice.)
- CRUSH GARLIC COARSELY: Minced garlic burns fast in stews. Smash the cloves with the flat side of your knife instead—just enough to expose the flesh, but leave some texture. It’ll infuse flavor without turning bitter. (I was skeptical until I tried it.)
- SKIP THE BOIL: Once beans are tender, lower the heat to a bare simmer and let them cook uncovered for the last 10 minutes. This thickens the stew naturally without making it mushy. (Does it look weird? Yes. Does it work? Every single time.)
Creative variations of this dish
Smoky Chipotle Twist
Swap the smoked paprika for 1 tbsp chipotle powder or 2 chipotle peppers in adobo sauce (minced) for a deeper, smokier heat. I love adding ½ cup diced tomatoes with the broth to balance the spice.
For extra richness, stir in 2 tbsp tomato paste during the simmer. This variation is inspired by my time in New Mexico, where chipotle and beans are a match made in heaven. 🌶️
Creamy Coconut Version
Turn these into a creamy delight by stirring in ½ cup coconut milk during the final 10 minutes of simmering. Add ½ tsp ground turmeric for color and warmth, plus ¼ cup chopped cilantro at the end.
This Thai-inspired twist works beautifully with jasmine rice or crusty naan. The coconut milk adds a velvety texture that pairs perfectly with the crispy edges.
Spicy Harissa Kick
For a North African flair, replace the smoked paprika with 1 tbsp harissa paste (adjust to taste for heat). Add 1 tsp ground coriander and ½ tsp ground caraway seeds with the cumin. Finish with 1 tbsp fresh lemon juice and 2 tbsp chopped parsley or cilantro.
Serve with warm flatbread or over couscous for an authentic touch. This version is my go-to when I crave bold, complex flavors.
Sweet Potato Addition
Add 1 cup diced sweet potato with the onions and cook until tender. The natural sweetness complements the smoky spices beautifully. I often use this variation when I have leftover sweet potatoes from my garden—it adds a satisfying heartiness to the dish.
For extra depth, a pinch of cinnamon or nutmeg works wonders. This makes a fantastic side or even a main dish when paired with a simple green salad.
Herb-Infused Broth
Boost the broth with 1 sprig fresh thyme, 1 sprig rosemary, and 1 bay leaf tied in cheesecloth. Remove the herbs before serving. This adds an earthy complexity that pairs perfectly with the garlic and cumin.
I also like adding ½ cup chopped kale or spinach during the final 5 minutes of cooking for a nutrient boost. The herbs infuse the broth with layers of flavor that elevate the dish to restaurant quality.
Carnitas-Inspired Crisp
For a Mexican-inspired twist, finish the beans with ½ cup diced carnitas or crispy chorizo (optional for vegetarians). The fat from the meat adds richness and helps create those coveted crispy edges. I also like adding ¼ cup chopped white onion and 2 tbsp lime juice at the end.
This variation is perfect for tacos or as a filling for stuffed peppers. The combination of textures and flavors is simply irresistible. 🔥
Nutrition facts
Frequently asked questions
Can I use canned beans instead of dried for this recipe?
For a quicker version, use 2 (15-ounce) cans of black beans, drained and rinsed. Skip the toasting step and add them directly with the broth. The texture will be slightly softer, but the flavors will still shine. Just reduce the simmering time to 15-20 minutes—they'll be tender immediately.
Why do the beans need to toast before simmering?
The toasting step creates those irresistible crispy edges while developing deeper flavors. When dried beans hit hot oil, their outer layer caramelizes slightly, adding texture and preventing mushiness. It’s like a flavor boost and texture upgrade in one move—don’t skip it unless you’re short on time!
How do I fix beans that turned out too mushy?
If your beans are too soft, the broth likely didn’t reduce enough. Next time, simmer uncovered for 10 extra minutes to thicken it. For an immediate fix, mash a few beans with a fork to thicken the sauce, or stir in 1 tablespoon cornstarch mixed with water. The crispy edges trick (pan-frying) can also mask mushiness—just focus on getting them golden!
Can I make this recipe in a slow cooker?
Yes! Sauté the onions, garlic, and spices first, then transfer everything to your slow cooker. Add 1 cup extra broth (beans absorb more in slow cooking) and cook on low for 6-7 hours or high for 3-4 hours. Finish with the crispy edges step in a separate pan—slow cookers can’t crisp like stovetop methods.
What’s the best way to reheat leftovers?
Reheat gently in a pot with 2 tablespoons broth or water over low heat until warmed through. For crispy edges, pan-fry a portion in olive oil for 2 minutes after reheating. Microwaving works but kills the crispiness—always reheat on the stovetop for best results.