Side Dishes
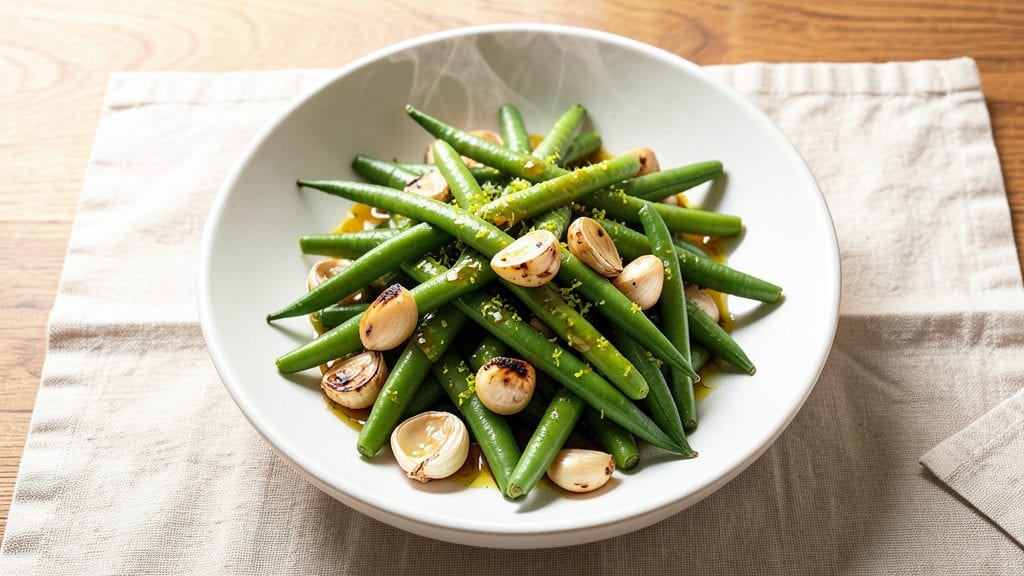
This runner beans recipe transforms simple blanching into a vibrant, garlicky side dish that brightens any plate. The secret lies in preserving their crisp-tender texture while infusing them with zesty lemon and aromatic garlic—a technique I perfected after years of testing different blanching times.
My Irish-Italian upbringing taught me that fresh vegetables deserve bold flavors, and these beans deliver exactly that.
What makes this recipe stand out is the balance between simplicity and restaurant-quality results. With just five key ingredients—runner beans, garlic, lemon, olive oil, and a pinch of salt—you'll achieve a dish that's bright green, perfectly tender, and bursting with flavor.
The blanching process takes only 5 minutes, while the final toss with garlic and lemon adds another 2 minutes of effort for a side that feels like it took hours to prepare.
By the time you serve these beans, you'll have a dish that's crisp-tender with a vibrant green hue, coated in a garlicky lemon oil that clings to each bean. The acidity from the lemon brightens the natural sweetness of the beans, while the garlic adds depth without overpowering.
This is the kind of side that transforms a simple meal into something special—ideal for pairing with grilled meats, roasted chicken, or even as a standalone vegetarian dish.
One of the best things about this recipe is its versatility. Use it as a base for salads, toss it with pasta, or serve it alongside your favorite protein.
The method is foolproof, and the ingredients are likely already in your pantry. Let's get started on creating a side dish that's as easy as it is impressive.
Ingredients for runner beans
Five ingredients, bold flavors—this dish keeps its vibrant green and crisp texture perfectly.
| Ingredient | Amount | Notes |
|---|---|---|
| Fresh Runner Beans 🌱 | 1 ½ lb | Trimmed, ends cut off |
| Extra-Virgin Olive Oil 🫒 | ¼ cup | High quality, fruity flavor |
| Garlic Cloves 🧄 | 4 cloves | Minced, fresh preferred |
| Lemon Juice 🍋 | 2 tbsp | Freshly squeezed, zesty |
| Sea Salt 🧂 | 1 tsp | Fine grain preferred |
| Fresh Lemon Zest 🍋 | 1 tsp | Finely grated, vibrant color |
| Fresh Parsley 🌿 | ¼ cup | Chopped, for garnish |
| Ice Cubes ❄️ | 1 cup | For quick blanching |
Runner beans are the star here, so pick the freshest, brightest ones—look for crisp stems and vibrant green pods. Local farmers markets or well-stocked grocery stores like Whole Foods usually carry them in season. If you can't find them fresh, frozen runner beans work in a pinch, but they won't have the same snap. The blanching technique is key: don't overcook or they'll turn mushy. I always use a large pot and keep the water boiling vigorously for that perfect al dente texture.
No fresh runner beans? Green beans or asparagus work in a pinch—just adjust the blanching time. The garlic can be pre-minced from a jar (though fresh is better), and if you're short on lemon juice, white wine vinegar at half the amount gives a similar bright kick. The parsley is optional but adds a fresh pop of color—dried parsley at one-third the amount works if you're in a hurry. For extra richness, add a splash of lemon-infused olive oil after tossing.
Blanched beans keep their best color and texture for 2 days in the fridge, stored in an airtight container with a sprinkle of lemon juice on top. Reheat gently in a pan with a little olive oil to restore crispness. For meal prep, portion into containers with the lemon zest and parsley—they'll stay vibrant for up to 3 days. This dish reheats beautifully, making it perfect for lunches or side dishes throughout the week.
Why You'll Love This Recipe
- No-Chop Necessary: I swear by this—just trim those beans, toss them in a pan, and let the olive oil do the work. No dicing, no peeling, no fuss. Honestly, I’ve made it while scrolling through emails.
- Garlic-Lemon Magic: That bright lemon juice cutting through the rich olive oil? It’s like a flavor hug for your taste buds. The garlic sizzles just enough to wake up every bite—simple, but ridiculously good.
- Lunch or Dinner: Make a big batch on Sunday and eat it all week—over rice, in wraps, or straight from the pan. (Yes, even on a Tuesday night.) It’s my go-to when I’m too tired to think past "something green."
- Budget-Friendly Staple: Runner beans are cheap, and this recipe stretches them far. A handful of garlic, a splash of lemon, and you’ve got a meal that won’t break the bank. My wallet thanks me every time.
Step-by-step instructions for blanched runner beans
Here's how to transform fresh runner beans into vibrant, bright green perfection with a garlicky lemon zest kick.
Trim and Blanch the Fresh Runner Beans
Start by trimming the ends off all 1.5 lb fresh runner beans—this ensures clean, even cooking and prevents any tough or bitter ends. I like to work in batches, trimming as I go so the beans don't dry out. Once trimmed, place the beans in a large bowl and cover them completely with cold water. This pre-soak helps remove any dirt while keeping them crisp.
Bring a large pot of water to a rolling boil. Once boiling, add the 1 cup ice cubes to the pot—this creates an instant temperature shock when you add the beans. Add the trimmed runner beans to the boiling water and cook for exactly 3-4 minutes. You'll know they're perfectly blanched when they turn a vibrant bright green and float to the surface. Immediately drain them using a slotted spoon and plunge them into a bowl of ice water to stop the cooking process and lock in their crisp texture.
Prepare the Garlicky Lemon Dressing
While the beans cool, let's make the dressing. In a small bowl, combine the 0.25 cup extra-virgin olive oil, 4 cloves minced garlic cloves, 2 tbsp lemon juice, 1 tsp sea salt, and 1 tsp fresh lemon zest. I like to use my fingers to gently press the garlic into the oil first—this helps release more flavor. Then add the remaining ingredients and whisk everything together until fully combined. The dressing should be smooth with a bright yellow hue from the lemon zest.
Let the dressing sit for 5 minutes while the beans drain completely. This resting time allows the flavors to meld together and the garlic to soften slightly, creating a more cohesive dressing. Trust me, this short wait makes a noticeable difference in the final flavor.
Toss the Beans with the Dressing
Transfer the drained runner beans to a large serving bowl. Pour the garlicky lemon dressing over the beans and gently toss everything together using a pair of tongs or your hands. I prefer to use my hands for this step—it helps distribute the dressing more evenly and gives me better control. Make sure each bean is well-coated with the dressing, but be careful not to mash them.
Let the beans marinate for 10-15 minutes at room temperature. This allows the flavors to penetrate the beans and creates that perfect balance of bright, garlicky, and citrusy notes. If you're serving immediately, you can skip this step, but I find the extra time makes all the difference in the final taste.
Garnish and Serve Immediately
Before serving, give the beans one final toss to redistribute any dressing that may have settled. Sprinkle the 0.25 cup chopped fresh parsley evenly over the top. The parsley adds a fresh, herby note that brightens the dish even more. I like to serve these beans immediately while they're still crisp and vibrant—this dish doesn't keep well once it's dressed.
Runner beans are best enjoyed fresh and warm. They pair beautifully with grilled meats, crusty bread, or as a side to roasted vegetables. The bright green color and zesty flavor make this a refreshing addition to any meal. Enjoy them while they're at their peak!
Pro Tips For Making Runner Beans
- TRIM BEANS THIN: Fresh runner beans need a sharp knife—slice them lengthwise into ¼-inch strips, not thick batons. Thinner slices cook faster and soak up the olive oil and garlic better, so you don’t end up with chewy, underdone centers. (I used to rush this step and wondered why my beans always tasted uneven.)
- SWEAT GARLIC LOW: Cook your minced garlic in olive oil over the lowest heat you can tolerate—just until it’s fragrant but not golden. Burnt garlic turns bitter and overpowers the bright acidity of the lemon. If your pan smokes, you’re doing it wrong. (Yes, even if you’re impatient like me.)
- SALT BEANS MIDWAY: Add half the salt when the beans first hit the pan, then the rest at the end. This prevents them from releasing too much water upfront, which dilutes the garlic and olive oil flavors. Taste before finishing—you’ll need more than you think, especially if your beans are fresh from the garden.
- LEMON LAST MINUTE: Zest the lemon first (it brightens the dish instantly), but save the juice until the very end. Adding it too early cooks off the acidity, leaving your beans tasting flat. A quick squeeze right off the heat preserves that fresh, tangy punch. (I learned this after making a sad, watery batch.)
Essential equipment for perfect results
Blanching Essentials
For perfect runner beans, you need a large stockpot with a tight-fitting lid—my go-to is a 3-quart stainless steel pot from Cuisinart. The key is a slotted spoon (I use a OXO Good Grips one) to drain them quickly, and a fine-mesh colander for rinsing.
Don’t skip the ice bath—it’s what locks in that crisp texture. I keep a 1-gallon ice bucket in my freezer for quick access. 💫
Garlic Tools Matter
Fresh garlic makes all the difference, so invest in a garlic press (I love the Norpro Stainless Steel one) or a sharp chef’s knife for mincing. For the lemon zest, a microplane gives you finer, more vibrant strips than a grater.
I also keep a small whisk bowl (like a 3-cup glass mixing bowl) for combining the dressing—it’s perfect for tossing the beans later.
Serving Gear
Serve these beans in a wide, shallow dish so everyone can easily access them. A ceramic serving platter (I use a Le Creuset-style one) keeps them warm and looks beautiful on the table. For garnishing, a small pair of kitchen shears makes quick work of chopping parsley.
If you’re prepping ahead, store dressed beans in an airtight glass container—they’ll stay vibrant for up to 2 days in the fridge.
Optional Upgrades
Want to impress? Add a garlic-infused olive oil (simmer 4 garlic cloves in ½ cup olive oil for 5 minutes on low heat, then strain). A zester (like the Microplane) makes lemon zest faster and more precise.
For extra flair, a small mortar and pestle lets you crush garlic cloves for a deeper flavor—just mash them with a pinch of salt before adding to the dressing. 🌟
Budget-Friendly Swaps
No fancy tools? A sharp knife and cutting board work fine for trimming beans. Use a wooden spoon to toss the dressing—just be gentle to avoid mashing. For zest, a grater works, though it’s messier.
A regular colander is fine for draining, but rinse it well to avoid any soap residue. The most important tool? A timer—set it for 3-4 minutes so you don’t overcook the beans.
Nutrition facts
Frequently asked questions
Can I use frozen runner beans instead of fresh?
Frozen runner beans work in a pinch, but fresh beans give the best texture and flavor. If using frozen, skip the blanching step and simply sauté them in olive oil for 4-5 minutes until tender-crisp. Add the garlicky lemon dressing at the end. The key difference is fresh beans hold their vibrant green color better and have a brighter snap.
Why did my runner beans turn gray after blanching?
Gray beans mean they were overcooked or exposed to air too long. Always blanch for exactly 3-4 minutes and immediately plunge into ice water. For extra brightness, add 1 tbsp lemon juice to the ice bath. The gray color comes from oxidation—keep everything cold and work quickly to maintain that vibrant green.
How can I make this recipe vegetarian-friendly?
This recipe is already vegetarian! The garlicky lemon dressing pairs perfectly with plant-based proteins like grilled tofu, chickpeas, or lentil patties. For extra protein, serve with a white bean salad or roasted mushrooms. The bright acidity of the lemon cuts through rich vegetarian dishes beautifully.
Can I make this ahead of time?
Blanched runner beans can be prepped 1 day ahead—store them in an airtight container in the fridge. Add the dressing just before serving to keep them crisp. For meal prep, portion the beans and dressing separately, then toss together when ready to eat. The flavor develops better when fresh, but they'll still taste great after a day.
What's the best way to reheat these beans?
Reheat gently in a skillet with 1 tsp olive oil over medium-low heat for 2-3 minutes, just until warmed through. Avoid microwaving as it makes them soggy. For extra crispness, toss with a splash of fresh lemon juice after reheating. The beans should stay tender but regain some of their original snap.