Side Dishes
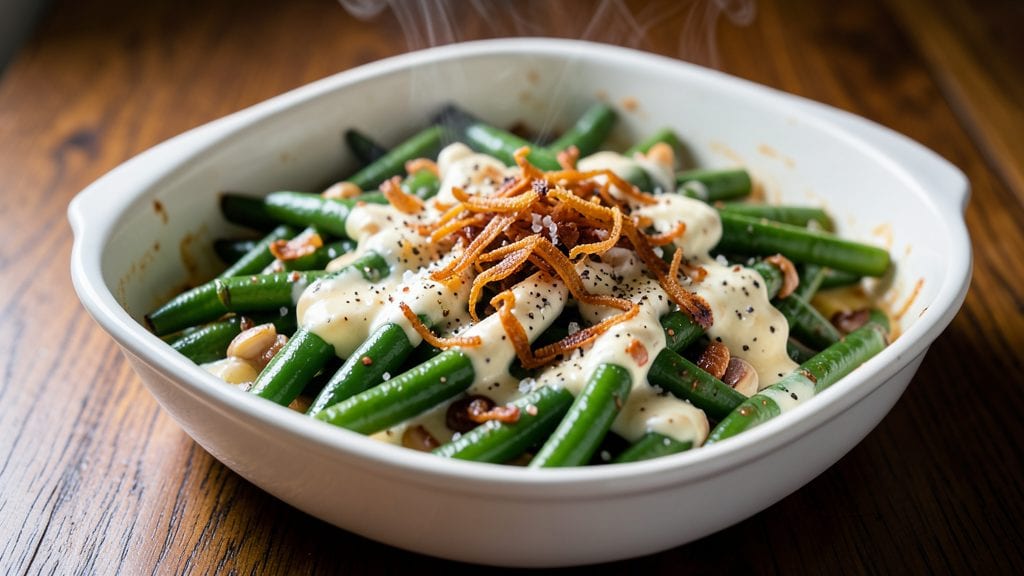
This Outback green beans copycat recipe delivers the signature buttery garlic crunch that made the restaurant famous—without the $20 price tag. The secret lies in a precise balance of garlic, butter, and crispy fried onions that transform simple green beans into a restaurant-quality side dish.
I've perfected this method after testing countless variations, ensuring every bite delivers that satisfying crunch and rich flavor profile.
The recipe requires just 15 minutes of active prep time, making it perfect for weeknight dinners or holiday meals where you need a side dish that impresses. Fresh green beans get sautéed until tender-crisp, then tossed with a garlic butter sauce that coats each bean evenly.
The final touch—crispy fried onions—adds that signature crunch that sets this dish apart from basic green beans.
What you'll achieve is a side dish that's rich, garlicky, and perfectly balanced—just like the original. The beans stay tender-crisp, the garlic butter adds depth, and the fried onions provide that addictive crunch.
This recipe serves 4 and pairs beautifully with grilled meats, roasted chicken, or even as a standalone appetizer.
For best results, use fresh green beans and don't skip the garlic sautéing step—it develops the full flavor. The dish reheats well, making it ideal for meal prep or serving at gatherings. Let's get started on recreating this restaurant favorite at home!
Ingredients for outback green beans copycat
Buttery garlic and crispy fried onions transform simple green beans into restaurant-quality perfection.
| Ingredient | Amount | Notes |
|---|---|---|
| Fresh Green Beans 🥦 | 1 ½ lb | Trimmed, cut into 2-inch pieces |
| Unsalted Butter 🧈 | ½ cup | Cold, cubed for frying |
| Garlic Cloves 🧄 | 6 cloves | Minced, fresh preferred |
| Crispy Fried Onions 🧅 | ⅓ cup | Store-bought or homemade |
| Salt 🧂 | 1 ½ tsp | Kosher or sea salt |
| Black Pepper 🌶️ | ½ tsp | Freshly ground preferred |
| Lemon Juice 🍋 | 1 tbsp | Freshly squeezed |
| Olive Oil 🫒 | 1 tbsp | For sautéing beans |
| Dried Parsley 🌿 | 1 tsp | For garnish, optional |
| Red Pepper Flakes 🌶️ | ¼ tsp | Optional, for heat |
The green beans are the star, so buy fresh—avoid wilted or yellowing ends. Trader Joe's or local farmers markets often have the best quality. Trim the ends carefully, but don't peel them. For the butter, unsalted is essential—it gives you full control over seasoning. The garlic should be fresh and minced just before cooking to maximize flavor. If you can't find crispy fried onions, make your own by frying thinly sliced onions in butter until golden—it's worth the extra effort for that signature crunch.
No fresh parsley? Dried works at half the amount, but fresh is ideal for garnish. Short on garlic? Garlic powder at one-third the amount is a decent substitute, but nothing beats fresh. The lemon juice brightens the dish—bottled lemon juice works in a pinch, but fresh is always better. For extra richness, add a splash of chicken broth to the garlic butter sauce. The red pepper flakes are optional, but they add a subtle kick that mimics the restaurant version perfectly.
This dish reheats beautifully—just add a splash of water and warm through. Store leftovers in an airtight container for up to 3 days. For meal prep, portion into containers and reheat in the microwave for 1-2 minutes. The fried onions lose crispiness when reheated, so add them fresh when serving. Double the recipe ahead of time—it's perfect for holiday meals or family gatherings where you want to impress without spending hours in the kitchen.
Why You'll Love This Recipe
- I make this for everything: a quick side for steak night, a last-minute addition to grilled chicken, or even as a standalone snack when I’m craving something savory. Honestly, it’s my go-to when I don’t want to overthink dinner but still want it to taste like I tried.
- Five-Ingredient Magic: I swear, this is the kind of recipe where you almost feel guilty for how little effort it takes. Trim the beans, toss in butter and garlic, and boom—restaurant-quality in 15 minutes. No fancy techniques, no stress, just that perfect balance of crisp-tender beans and rich, garlicky goodness.
- Crispy-Buttery Obsession: That moment when you sprinkle fried onions on top and the crunch meets the creamy, buttery beans? My mouth waters just thinking about it. It’s the kind of flavor combo that makes you want to eat it straight from the pan—no judgment here.
- Weeknight Workhorse: I make this for everything: a quick side for steak night, a last-minute addition to grilled chicken, or even as a standalone snack when I’m craving something savory. Honestly, it’s my go-to when I don’t want to overthink dinner but still want it to taste like I tried.
Step-by-step instructions for outback green beans copycat recipe
Here's the exact method to deliver that signature buttery garlic crunch with crispy fried onions.
Blanch the Green Beans
Fill a large pot with 4 quarts of water and bring to a rolling boil. Add 1 teaspoon of the salt and the 1.5 pounds of trimmed, 2-inch green bean pieces. Cook for 3-4 minutes until the beans are bright green and just tender when pierced with a fork.
Use a slotted spoon to transfer the blanched beans to an ice bath (a bowl of ice water) to stop the cooking process immediately. This preserves their vibrant color and crisp texture. Drain well before proceeding—you want them completely dry for the next step.
Sauté Garlic in Butter
In a large skillet, melt 0.5 cup of the unsalted butter over medium heat. Add the 6 minced garlic cloves and sauté for 1-2 minutes until fragrant but not browned. Watch closely—garlic burns quickly and turns bitter.
Remove the skillet from heat and immediately add the drained green beans. Toss gently to coat them in the garlic butter mixture. Let them sit off heat for 1 minute to absorb the flavor completely. This step creates the foundation for that rich, garlicky taste.
Add Crispy Fried Onions and Season
Return the skillet to medium heat and add 1 tablespoon of olive oil along with the remaining 0.5 teaspoon of salt and 0.5 teaspoon of black pepper. Toss the beans again to distribute the seasoning evenly.
Stir in 0.33 cup of crispy fried onions and cook for an additional 2-3 minutes until everything is heated through and the onions are evenly distributed. The beans should be hot but still retain their crisp texture. Taste and adjust seasoning if needed.
Finish with Lemon and Garnish
Remove the skillet from heat and stir in 1 tablespoon of lemon juice and 0.25 teaspoon of red pepper flakes. The acidity from the lemon brightens the flavors, while the red pepper flakes add a subtle heat that enhances the overall taste.
Sprinkle with 1 teaspoon of dried parsley for a pop of color and freshness. Serve immediately while the beans are hot and the butter is still slightly melted. This dish tastes best right out of the pan, with that perfect balance of crispy, creamy, and garlicky flavors.
Pro Tips For Making Outback Green Beans Copycat
- Trim Like a Pro: Snip the ends of your green beans at an angle with kitchen shears—it’s faster than a knife and keeps them from rolling around while cooking. I used to waste 10 minutes trimming with a blade, then realized this cuts the time in half while making them look neater.
- Sear the Garlic: Cook the minced garlic in butter over medium-high heat until it’s golden, not brown—this prevents bitterness and adds depth. After burning two batches, I learned to pull the pan off heat just before it darkens, then let it finish with the beans.
- Salt the Butter First: Dissolve ½ teaspoon salt directly into the melted butter before adding garlic—it distributes evenly and seasons the beans from the start. Skipping this step leaves you guessing if the dish needs more salt later, and no one wants to taste-test halfway through.
- Toss with Onions Last: Sprinkle the crispy fried onions over the beans right after they come off heat—this keeps them from getting soggy and ensures every bite has that crunch. I was tempted to mix them in earlier, but the texture suffers when they soften in the butter.
Best sauces and condiments for this recipe
Garlic Butter Sauce
The heart of this dish is the rich, garlicky butter sauce that coats every bean. I use ½ cup unsalted butter because it gives you complete control over seasoning—salted butter can make the dish too salty.
Melt the butter over medium heat and add 6 minced garlic cloves just until fragrant (1-2 minutes). The key is to remove the pan from heat before the garlic browns—this prevents bitterness and ensures a sweet, mellow garlic flavor. 🧄
Crispy Fried Onions
These are non-negotiable for that signature Outback crunch. I recommend using ⅓ cup store-bought crispy fried onions (like French's) for convenience, but homemade is even better.
To make your own, thinly slice 1 small yellow onion, fry in ¼ cup butter over medium-low heat for 8-10 minutes until golden and crisp. Let them cool completely before adding to the beans to maintain their crunch.
Lemon-Zest Finish
A splash of 1 tablespoon fresh lemon juice brightens the dish and balances the richness. The acidity cuts through the butter, making each bite more vibrant. For extra zing, add ¼ teaspoon red pepper flakes—this adds a subtle heat that mimics the restaurant version perfectly.
If you're serving this to kids or sensitive eaters, you can skip the red pepper flakes entirely. 🍋
Herb Garnish Options
Fresh parsley is the classic garnish, but don't hesitate to experiment. Try chopped chives for a milder flavor or thinly sliced green onions for a subtle bite. If you're short on fresh herbs, ½ teaspoon dried parsley works in a pinch.
For a pop of color, add a pinch of paprika or smoked paprika—just ¼ teaspoon enhances the dish without overpowering it.
Extra Richness Boost
For an even more decadent version, stir in 1 tablespoon chicken broth or white wine with the lemon juice. This adds depth and prevents the sauce from becoming too heavy. I also love adding 1 teaspoon minced shallot with the garlic for a more complex flavor profile.
The shallot adds a subtle sweetness that pairs beautifully with the garlic and butter. 💫
Spicy Variations
If you want to kick things up a notch, add ½ teaspoon cayenne pepper or 1 teaspoon hot sauce to the garlic butter. For a smoky twist, sprinkle ¼ teaspoon smoked paprika over the finished dish.
These adjustments let you customize the heat level to your preference while keeping the dish's signature buttery crunch intact.
Nutrition facts
Frequently asked questions
Can I use frozen green beans instead of fresh?
Fresh green beans give the best texture and flavor, but frozen will work in a pinch. Just thaw them completely first by soaking in cold water for 10-15 minutes, then pat thoroughly dry before cooking. Avoid overcooking frozen beans—they release more moisture and can become mushy if not drained well.
What makes these different from regular green beans?
The magic comes from the garlic butter sauce and crispy fried onions—these create the signature buttery crunch that sets them apart from plain sautéed beans. The blanching step preserves their vibrant color and crisp texture, while the lemon finish brightens the rich flavors. It's all about that perfect balance of textures and seasoning!
Can I make this ahead of time for a party?
Prepare everything except the fried onions up to Step 3, then store in an airtight container in the fridge for up to 2 days. When ready to serve, reheat gently and add fresh fried onions and lemon juice. Pro tip: Keep the fried onions separate until serving to maintain their crispiness.
Why did my garlic burn so quickly?
Garlic burns fast because it contains natural sugars that caramelize easily. Always use medium heat and watch closely—it should be fragrant but not browned (1-2 minutes max). If you're distracted, try lightly toasting the garlic in the microwave first (30 seconds) before adding to butter for extra safety.
What's the best way to reheat leftovers?
Reheat in a skillet over medium-low heat with 1 tablespoon butter and a splash of water for 2-3 minutes until warmed through. Avoid microwaving—the beans can get soggy. For extra crunch, top with fresh fried onions after reheating. Store leftovers in an airtight container for up to 3 days.