Side Dishes
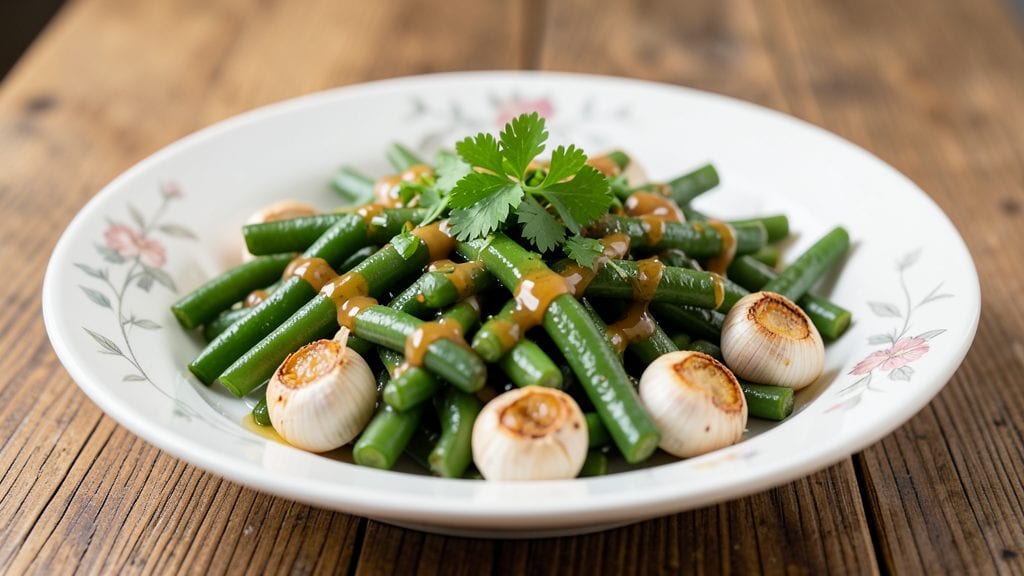
This old-fashioned green bean recipe delivers the comforting, crisp-tender texture and rich buttery flavor that makes family dinners feel like home.
The secret lies in high-heat sautéing with just butter, garlic, and salt—no complicated techniques, just a timeless method that transforms simple green beans into a side dish worthy of Sunday supper. I’ve perfected this recipe over years of holiday gatherings, where it disappears faster than the mashed potatoes.
The beauty of this method is its simplicity: fresh green beans cut into even lengths, quickly blanched to preserve their vibrant color, then finished in a hot skillet with butter and garlic until they develop that perfect crisp-tender bite.
What you’ll end up with is a side dish that’s tender at the core but still holds its shape, all while carrying the warm, aromatic notes of garlic and butter that make every bite irresistible. It’s the kind of dish that pairs effortlessly with roasted meats or creamy mashed potatoes.
This recipe is designed to be foolproof—no overcooking, no soggy beans, just a foolproof technique that delivers restaurant-quality results at home. The key is timing: a quick blanch to soften slightly, followed by a fast sauté to crisp the edges just enough.
It’s the same method my grandmother used, and it’s why this dish remains a staple at every holiday table. Once you try it, you’ll never go back to canned or mushy green beans.
For extra flavor, consider adding crispy bacon or fresh herbs like parsley, but the classic version—just butter, garlic, and salt—is where the magic truly lies. Serve immediately while the beans are hot and the butter is still glistening. Here’s how to make it perfectly every time.
Ingredients for old fashioned green bean
Fresh green beans, rich butter, and aromatic garlic—just eight ingredients for a timeless side dish.
| Ingredient | Amount | Notes |
|---|---|---|
| Fresh Green Beans 🥦 | 1 ½ lb | Trimmed, cut into 2-inch pieces |
| Unsalted Butter 🧈 | 6 tbsp | Cold, cut into small cubes |
| Garlic Cloves 🧄 | 4 cloves | Thinly sliced, not minced |
| Kosher Salt 🧂 | 1 ½ tsp | Fine grain preferred |
| Fresh Lemon Juice 🍋 | 1 tbsp | Optional, for brightness |
| Fresh Parsley 🌿 | ¼ cup | Chopped, for garnish |
| Water 💧 | 4 cups | For blanching |
| Ice Cubes ❄️ | 1 cup | For shocking beans |
The green beans are the foundation, so look for vibrant, crisp ones—avoid anything rubbery or yellowing. Local farmers markets or the produce section at Whole Foods usually carry the freshest. Trim the ends and cut into even lengths (about 2 inches) for consistent cooking. If you can't find fresh, frozen works in a pinch, but thaw and pat dry thoroughly. The butter is non-negotiable—use unsalted so you control the seasoning, and cold cubes ensure they brown beautifully. Garlic should be fresh, not dried or powdered—Italian markets often have the best quality at great prices.
No fresh parsley? Dried oregano at one-third the amount works, though it lacks the freshness. Short on butter? Olive oil in a 1:1 swap keeps the flavor profile, but the texture won’t be quite the same. The lemon juice is optional but adds a bright finish—use freshly squeezed if you have it, or skip entirely for a purer classic flavor. The kosher salt is key: Diamond Crystal is ideal, but any fine grain works. For the blanching water, boil in a large pot—you’ll need enough to submerge the beans completely. And that ice bath? Critical for stopping the cooking process—don’t skip it if you want that crisp-tender texture.
Blanched beans keep for 3 days in the fridge if stored in an airtight container with a paper towel to absorb moisture. The cooked green beans reheat beautifully—just warm in a skillet with a splash of water for 2-3 minutes. For meal prep, blanch the beans ahead and store them in the fridge; sauté just before serving. The butter and garlic can be prepped in advance too—slice the garlic and cube the butter the night before to save time. This dish is best served immediately, but if you must wait, keep it warm in a 200°F oven for up to an hour.
Why You'll Love This Recipe
- The secret’s in the finish: bright lemon juice cutting through the rich butter, while the garlic adds a warm, aromatic punch. Between us, that crisp-tender texture with the buttery edges? It’s the kind of dish that makes you reach for seconds without thinking.
- Five-Ingredient Magic: I swear by this—just beans, butter, garlic, salt, and lemon. That’s it. No fancy gadgets, no hidden pantry staples, and no stress. Honestly, I’ve made this while waiting for dinner to cook and still had time to set the table.
- Garlic-Lemon Crunch: The secret’s in the finish: bright lemon juice cutting through the rich butter, while the garlic adds a warm, aromatic punch. Between us, that crisp-tender texture with the buttery edges? It’s the kind of dish that makes you reach for seconds without thinking.
- Weeknight to Holiday: I toss these together for lazy Tuesdays, but they also star at my Thanksgiving table—no one ever guesses how simple they are. Serve them alongside steak, fish, or even mashed potatoes, and they’ll disappear faster than my willpower on a Sunday morning.
Step-by-step instructions for buttery garlic sautéed green beans
Here's how to achieve perfectly crisp-tender green beans with rich garlic butter flavor.
Blanch and Shock the Green Beans
Bring the 4 cups water to a rolling boil in a large pot. While waiting, trim the ends from the 1.5 lb fresh green beans and cut them into 2-inch pieces. Once the water boils, add the 1.5 teaspoons kosher salt and cook the green beans for 3-4 minutes until they're bright green and just tender but still slightly crisp.
Immediately drain the beans and transfer them to a large bowl filled with 1 cup ice cubes. This shocking process stops the cooking and preserves their vibrant color and crisp texture. Let them sit for 5 minutes in the ice water before draining again. This step is crucial for achieving that perfect crisp-tender bite that makes these green beans truly old-fashioned special.
Sauté Garlic in Butter Until Fragrant
In a large skillet, melt 4 tablespoons of the cold cubed unsalted butter over medium heat. Add the 4 cloves thinly sliced garlic and cook for 1-2 minutes until the garlic is golden and fragrant but not browned. Watch carefully—garlic burns quickly, and you want that sweet, nutty aroma without bitterness.
Remove the skillet from heat and set it aside. This prevents the garlic from overcooking while you prepare the remaining butter. The residual heat will keep everything warm while you finish the preparation. I've found that partially cooking the garlic first creates more flavor without risking burning when you add the beans back to the pan.
Finish with Butter and Lemon
Return the skillet to medium heat and add the remaining 2 tablespoons cold cubed unsalted butter. Let it melt completely, then add the drained green beans. Toss gently to coat them evenly with the butter. Cook for 3-4 minutes until the beans are heated through and the butter has formed a glossy sauce around them.
Stir in the 1 tablespoon fresh lemon juice and toss again. The acidity brightens the flavors and cuts through the richness of the butter. You'll notice the beans developing a beautiful golden color as they absorb the flavorful butter. This is where the magic happens—the combination of the crisp-tender beans with the rich garlic butter creates that classic old-fashioned taste.
Garnish and Serve Immediately
Remove the skillet from heat and sprinkle with the 0.25 cup chopped fresh parsley. Toss one final time to distribute the parsley evenly. The parsley adds a fresh contrast to the rich butter and garlic flavors while giving the dish a pop of color. Serve the green beans immediately while they're hot and crisp-tender.
These green beans should have a perfect balance of crisp edges and tender centers, with a glossy coating of garlic butter. Each bite should deliver that satisfying crunch followed by rich, savory flavor. The lemon brightens the dish without overpowering, and the parsley adds a fresh finish. This classic preparation brings out the natural sweetness of fresh green beans while adding depth through the garlic butter sauce.
Pro Tips For Making Old Fashioned Green Bean
- Trim Like a Pro: Cut the ends of your green beans at an angle—just a quarter-inch off each side—so they sit flat in the pan. This keeps them stable during cooking (no flipping disasters) and lets the butter and garlic cling to every bite instead of pooling at the bottom.
- Salt the Butter First: Melt the butter over medium heat, then sprinkle in half the kosher salt before adding garlic. This dissolves the salt into the fat, so it coats the beans evenly instead of clumping or leaving you guessing if it’s seasoned enough.
- Don’t Rush the Garlic: Sauté the minced garlic in butter until it’s golden, not brown—about 30 seconds max. Overcooking turns it bitter, and you’ll taste it in every bite. If your pan’s too crowded, work in batches.
- Finish with Lemon Zest: After squeezing in the lemon juice, grate a tiny pinch of zest over the top. It brightens the dish instantly (yes, even if you’re using fresh juice) and adds a texture that store-bought lemon drops miss. Just 5 seconds, but it makes a real difference.
Creative variations of this dish
Classic Southern Style
For a true Southern twist, add 4 slices of crispy bacon to the skillet during the final sauté. Cook the bacon until crispy, then remove and crumble it over the beans before serving.
The smoky, salty bacon pairs perfectly with the buttery garlic flavor, creating a dish that feels like a holiday centerpiece. I like to use Applewood-smoked bacon for extra depth, but any quality bacon works. 🥓
Herb-Infused Variations
Swap the parsley for 2 tablespoons chopped fresh chives or 1 tablespoon dried thyme for a different herbal profile. Fresh tarragon adds a unique anise-like note that complements the garlic beautifully.
For a Mediterranean touch, mix 1 teaspoon dried oregano with the parsley. These herbs elevate the dish without overpowering the classic butter and garlic base.
Cheesy Baked Twist
For a baked variation, toss the blanched and shocked green beans with ½ cup shredded sharp cheddar and 2 tablespoons grated Parmesan after sautéing. Transfer to a baking dish, broil for 3-4 minutes until the cheese melts and turns golden.
This creates a crispy, cheesy topping that adds richness. Serve immediately for the best texture. 🧀
Spicy Kick Option
Add ½ teaspoon red pepper flakes or 1 teaspoon hot sauce during the final sauté to introduce heat. For a smoky-spicy twist, include ½ teaspoon smoked paprika with the garlic.
This variation works especially well with grilled meats or hearty stews. Just be mindful of the heat level—start with less and adjust to taste. 🌶️
Vegetarian Protein Boost
For a more substantial side, stir in ½ cup cooked quinoa or ½ cup crumbled feta cheese after the beans are sautéed. The quinoa adds a nutty texture, while the feta brings a tangy contrast.
Both options turn this classic dish into a satisfying vegetarian main or hearty side. I recommend using crumbled goat cheese for an extra-fancy touch. 🌱
Winter Root Vegetable Add-Ins
In colder months, toss in ½ cup diced roasted butternut squash or ½ cup caramelized onions during the final sauté. These additions add natural sweetness that balances the savory garlic butter.
The squash works especially well with the crisp-tender texture of the beans, making this dish feel like a warm, comforting hug on a chilly day. 🍠
Nutrition facts
Frequently asked questions
Can I use frozen green beans instead of fresh?
Yes, but with one key adjustment: thaw and pat the beans completely dry before blanching. This prevents excess moisture that can make them soggy. Frozen beans work well—just add 30 seconds to the blanching time (3.5-4 minutes total) since they're already partially cooked. The texture will still be crisp-tender if you shock them properly in ice water.
Why do my green beans turn mushy?
Overcooking or skipping the ice bath are the usual culprits. The blanching water must stay at a rolling boil, and the beans should cook for only 3-4 minutes. Immediately shocking them in ice water stops the cooking process—never skip this step! Also, avoid crowding the pot during blanching, as this lowers the water temperature.
Can I make this ahead of time?
Blanch and shock the beans up to 1 day ahead, then store them in an airtight container with a paper towel to absorb moisture. Reheat gently in a skillet with 1 tablespoon butter for 2-3 minutes until warmed through. For the best texture, finish with fresh garlic butter and parsley just before serving.
What's the best way to store leftover green beans?
Keep them in an airtight container in the fridge for up to 3 days. Reheat in a skillet over medium heat with a splash of water to retain moisture. For longer storage, freeze blanched beans (uncooked) for up to 3 months
How do I know when the garlic is done?
Look for golden color and a sweet, nutty aroma—not bitter or browned. Thinly sliced garlic should take 1-2 minutes over medium heat. If it starts to darken, remove it immediately. The goal is fragrant, not crispy—this prevents overpowering the beans with bitterness.