Desserts
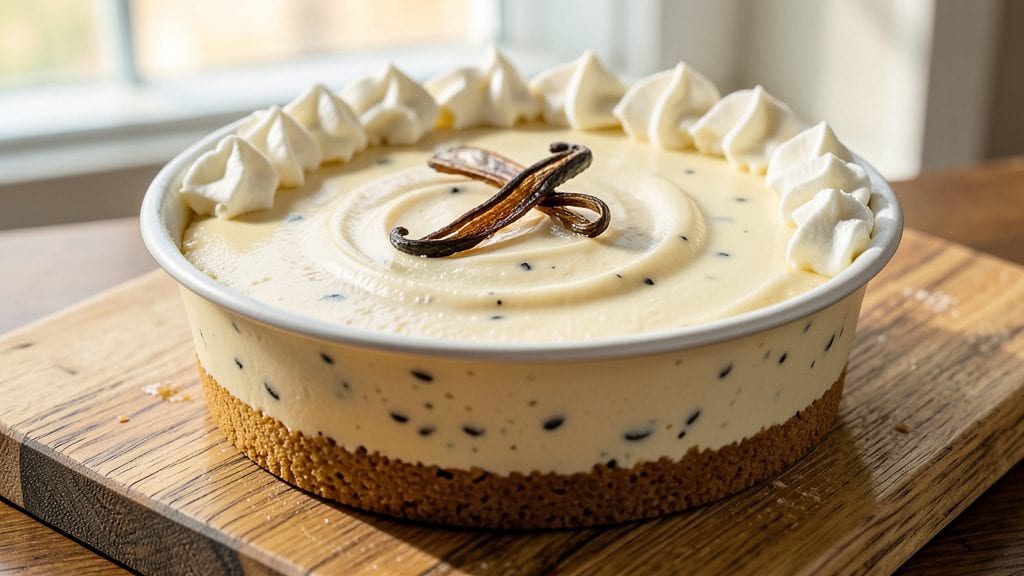
This Magnolia Bakery-style vanilla bean cheesecake delivers the same silky-smooth texture and rich vanilla flavor that made it legendary. After years of perfecting the recipe, I’ve cracked the code for a foolproof water bath method that ensures a crack-free center every time.
The secret lies in precise timing, proper chilling, and that signature vanilla bean swirl that takes it from ordinary to extraordinary.
The crust is where it all begins—crisp, buttery, and sturdy enough to hold the velvety filling without crumbling.
I use a blend of digestive biscuits and butter for that perfect balance of texture, while the filling gets its signature smoothness from cream cheese, eggs, and a touch of vanilla bean paste.
The water bath baking method is non-negotiable; it’s what guarantees that creamy, jiggly center that melts in your mouth.
By the time you’re done, you’ll have a cheesecake with layers of golden crust, silky filling, and those signature vanilla bean swirls that make every slice feel like a little taste of Magnolia Bakery.
The aroma alone will have everyone gathering around the table, and the first bite? Pure, velvety perfection. This is the kind of dessert that turns ordinary gatherings into memorable moments.
Serve it chilled with fresh berries or a drizzle of caramel for extra elegance, or enjoy it plain to let the flavors shine. Whether you’re baking for a special occasion or just treating yourself, this recipe delivers restaurant-quality results at home. Let’s get started on creating your own showstopper.
Ingredients for magnolia bakery vanilla bean cheesecake
Buttery crust, velvety filling, and real vanilla beans—this is the Magnolia Bakery magic in your oven.
| Ingredient | Amount | Notes |
|---|---|---|
| Digestive Biscuits 🍪 | 1 ½ cups | Crushed into fine crumbs |
| Unsalted Butter 🧈 | ¾ cup | Cold and cubed |
| Granulated Sugar 🍚 | ½ cup | For crust sweetness |
| Large Eggs 🥚 | 4 whole | Room temperature |
| Full-Fat Cream Cheese 🧀 | 32 oz | Room temperature, high-fat |
| Vanilla Bean Paste 🌿 | ½ oz | Real vanilla bean preferred |
| Powdered Sugar 🍚 | 1 cup | For smooth topping |
| Heavy Whipping Cream 🥛 | 1 cup | Cold for topping |
| Vanilla Extract 🍯 | 2 tsp | Pure vanilla extract |
| Salt 🧂 | ½ tsp | Fine sea salt |
| Vanilla Beans 🌿 | 2 whole | Split lengthwise for swirls |
| Sour Cream 🥛 | ½ cup | Full-fat for richness |
| Water 💧 | 1 cup | For water bath |
The crust starts with Digestive Biscuits—I grab the Keebler brand for that perfect crumb texture, but any sturdy graham cracker works. Cold butter is non-negotiable here; it creates those perfect flaky layers. For the vanilla beans, Madagascar Bourbon from Penzeys is my go-to, but any quality vanilla bean will do. Split them lengthwise before adding to the filling for those iconic swirls. The water bath is where the magic happens—hot water in a deep pan ensures even baking without cracks. Preheat your oven to 325°F and let everything sit at room temperature for at least an hour before mixing.
No vanilla beans? Double the vanilla extract and add a pinch of vanilla sugar for depth. For the cream cheese, Philadelphia brand is my standard, but any full-fat block works—just make sure it's room temperature. The sour cream adds that signature tang, but Greek yogurt is a solid swap if you're in a pinch. The crust can be pre-baked for an hour if you're worried about sogginess, but I find the water bath method handles it perfectly. If you're short on time, microwave the butter 40 seconds to just melt it for the crust, then mix with your hands—it works just as well.
This cheesecake is at its best after 24 hours of chilling, but trust me, it's worth the wait. Store leftovers in an airtight container for up to 5 days in the fridge, or freeze for 3 months. The topping keeps beautifully for 2 weeks in the fridge, so make extra—it's perfect on pancakes or ice cream. For serving, I always garnish with a fresh vanilla bean slice and a few berries. The aroma alone will have everyone thinking you ordered from Magnolia Bakery.
Why You'll Love This Recipe
- No-Fuss Foundation: I swear by the digestive biscuit crust—it’s the secret weapon here. No rolling, no fussing; just crush, mix, and press. That buttery crunch holds up for days, and honestly? It’s the kind of base that makes me feel like I’m cheating with a shortcut.
- Vanilla Bean Magic: The moment that split vanilla bean scrapes into the cream cheese filling? Pure gold. It’s not just flavor—it’s this warm, floral whisper that lingers with every bite. Between us, store-bought extracts can’t compete with the real deal here.
- Weeknight Hero: This cheesecake plays well with others. Too busy to bake? Make it ahead—it actually tastes better after sitting overnight. And if you’re hosting? It’s the one dessert that feels fancy but won’t stress you out.
- Budget-Friendly Luxury: Full-fat cream cheese and butter make it rich, but the crust costs pennies. I’ve made this for potlucks where people assumed it was from a bakery—no one ever asks for the recipe, but they always ask where to buy it. (Spoiler: your kitchen.)
Step-by-step instructions for Magnolia Bakery vanilla bean cheesecake
This is where the magic happens—where silky swirls meet a buttery crust for that signature Magnolia Bakery texture.
Prepare the Crust with Perfect Texture
Preheat your oven to 350°F and line the bottom of a 9-inch springform pan with parchment paper. This prevents sticking and makes removal effortless later. In a food processor, pulse the 1.5 cups digestive biscuits until you achieve fine crumbs—no floury dust, just coarse buttery bits. I like to pulse in short bursts to avoid over-processing.
Add the 0.75 cup cold cubed unsalted butter and 0.5 cup granulated sugar to the food processor and pulse until the mixture resembles wet sand. Press this firmly into the bottom of your prepared pan, creating an even crust. Bake for 15 minutes—this pre-bake ensures a crisp foundation that won't get soggy during the water bath later. Let it cool slightly while you prepare the filling.
Create the Signature Vanilla Swirl Filling
In a large mixing bowl, beat the 32 oz full-fat cream cheese and 0.5 cup sour cream on medium speed until completely smooth—no lumps should remain. This step is crucial for that velvety texture. Add the 4 whole room-temperature large eggs one at a time, mixing just until each is incorporated. Scrape down the bowl after each addition to ensure even blending.
In a small bowl, whisk together the 1 cup powdered sugar, 2 teaspoons vanilla extract, 0.5 teaspoon salt, and 0.5 oz vanilla bean paste. Gradually add this mixture to the cream cheese while mixing on low speed. Split the 2 whole vanilla beans lengthwise and scrape out the seeds, then swirl them through the batter for maximum flavor infusion. The batter should be thick but pourable—if it's too stiff, you can gently fold in 1-2 tablespoons of water to loosen it.
Assemble and Bake with Precision
Pour the filling over the cooled crust, spreading it evenly. Place the springform pan inside a larger roasting pan and carefully pour the 1 cup water into the bottom of the roasting pan. This water bath creates gentle steam, preventing cracks as the cheesecake bakes. Bake at 325°F for 60-75 minutes—the center should still jiggle slightly when gently shaken, but the edges should be set.
Here's the thing—don't open the oven during baking. The sudden temperature change can cause the top to crack. Instead, trust your timer and the visual cue of a slightly wobbly center. When done, remove from the water bath and let it cool completely at room temperature for at least 2 hours before refrigerating. Patience here prevents that dreaded cheesecake sink.
Prepare the Vanilla Bean Topping
While the cheesecake cools, whip the 1 cup cold heavy whipping cream to soft peaks in a chilled bowl. Add the remaining 1 teaspoon vanilla extract and 1 tablespoon powdered sugar, then whip to stiff peaks. This topping should hold its shape when spooned—if it's too runny, chill the bowl for 10 minutes before attempting again.
Spread the whipped cream evenly over the completely chilled cheesecake. Use a knife to create decorative swirls or simply spread it smoothly. Return to the refrigerator for at least 4 hours (overnight is ideal) to allow the flavors to meld and the topping to set. This resting period transforms good into extraordinary.
Serve with Confidence
Run a thin knife around the edge of the springform pan to loosen the cheesecake. Release the sides gently and transfer to a serving plate. Slice with a hot knife (dip in warm water and wipe dry between cuts) for clean, professional-looking pieces. The texture should be silky throughout with those characteristic vanilla bean swirls peeking through.
Serve chilled with fresh berries or a dusting of powdered sugar. The crust should remain crisp, the filling perfectly smooth, and each bite should deliver that unmistakable vanilla bean aroma. This is the cheesecake that made Magnolia Bakery famous—and now it's yours to recreate.
Pro Tips For Making Magnolia Bakery Vanilla Bean Cheesecake
- Pulse the Biscuits: Use a food processor for 8-10 seconds—just until the crumbs are fine but not powdery. I learned this the hard way: over-processing turns them into flour, and your crust loses that perfect buttery texture. (Yes, even if you're impatient like me.)
- Whip the Cream Cheese: Beat the cream cheese and butter together until completely smooth—no streaks, no lumps—before adding sugar or eggs. After burning three batches with grainy filling, I finally realized this step isn’t optional. Use a stand mixer for 2-3 minutes; it’s the thing that matters most.
- Eggs at Room Temp: Let your eggs sit in warm water for 10 minutes before using them. Cold eggs can cause the cheesecake to split or sink in the middle, and no one wants to deal with that. (Your future self will thank you.)
- Water Bath, Not Foil: Skip the foil—wrap the springform pan directly in plastic wrap before adding the water bath. It locks in moisture better and prevents the crust from getting soggy. I was skeptical until I tried it, and now it’s non-negotiable.
Dietary considerations for this recipe
Gluten-Free Adaptation
For a gluten-free version, replace the digestive biscuits with a gluten-free graham cracker crust or a blend of almond flour and butter. I use Schär brand gluten-free graham crackers crushed into fine crumbs, mixed with 0.75 cup cold butter and 0.5 cup sugar.
Press firmly into the pan and bake for 12 minutes at 350°F—just slightly less time to prevent burning. The texture stays crisp when properly chilled. 🌱
Dairy-Free Swaps
This cheesecake relies heavily on dairy, but you can adapt it with dairy-free cream cheese like Kite Hill or Violife. For the whipped topping, use coconut cream (chilled overnight) or dairy-free heavy whipping cream like Forager.
Replace sour cream with dairy-free sour cream or cashew cream (blend 1 cup soaked cashews with 2 tbsp lemon juice). The texture will be slightly lighter but still rich. 🧀
Lower Sugar Options
Reduce the 1 cup powdered sugar in the filling to 0.75 cup and use monk fruit sweetener or erythritol for half the remaining amount. For the crust, cut the sugar to 0.35 cup and add 1 tsp cinnamon to enhance flavor.
The cheesecake will still be sweet but with fewer calories. I also recommend using vanilla bean paste instead of extract for deeper flavor without extra sugar. 🍯
Egg-Free Version
Replace the 4 eggs with a flax egg substitute (mix 4 tbsp ground flaxseed with 10 tbsp water, let sit for 10 minutes). For extra stability, add 2 tbsp cornstarch to the filling.
The texture will be slightly denser but still creamy. Bake for 70-80 minutes—the longer time helps set the structure without eggs. Chill for 24 hours to ensure firmness. 🥚
Nut-Free Considerations
If nut allergies are a concern, stick to the original crust but ensure all ingredients (like vanilla bean paste) are nut-free certified. For the filling, avoid almond milk or cashew substitutions.
The standard recipe is naturally nut-free, but always double-check labels on cream cheese, sour cream, and vanilla extracts for cross-contamination warnings. 🌿
Keto-Friendly Adjustments
For a keto version, use 1.5 cups almond flour (or crushed pecans) mixed with 0.75 cup melted butter for the crust. Replace the 1 cup powdered sugar with 0.5 cup erythritol or monk fruit sweetener.
The filling stays the same but omit the whipped cream topping—dust with powdered erythritol instead. This version has ~6g net carbs per slice and keeps the signature vanilla flavor. 🥑
Nutrition facts
Frequently asked questions
Why does this recipe use a water bath for baking?
The water bath creates gentle steam that prevents cracks while baking. This method ensures even heat distribution, giving you that signature creamy, jiggly center without the dreaded sink. The steam also helps the crust stay crisp instead of getting soggy from the filling's moisture.
Can I make this cheesecake ahead of time?
This cheesecake actually tastes better after 24 hours of chilling. The flavors meld and the texture becomes even more velvety. Store it in an airtight container in the fridge for up to 5 days or freeze for 3 months. Just let it sit at room temperature for 30 minutes before serving.
What's the best way to avoid cracks in the cheesecake?
First, don't overmix the batter—just combine until smooth. Second, use room-temperature ingredients (especially eggs and cream cheese) to prevent lumps. Most importantly, never open the oven door during baking and let it cool completely before refrigerating. The water bath helps too—it's your secret weapon against cracks!
Can I substitute vanilla extract for vanilla bean paste?
Yes, but you'll lose some depth of flavor. Use double the amount of vanilla extract (so 1 oz instead of 0.5 oz paste) and add a pinch of vanilla sugar if available. For the swirls, split a vanilla bean and scrape the seeds into the batter—they'll create beautiful flecks that make it look restaurant-quality.
How do I get that perfect crust texture?
Use cold butter and pulse the biscuits in short bursts until they're fine crumbs—not floury. Press the mixture firmly into the pan for an even base. Bake the crust for 15 minutes before adding the filling to prevent sogginess. The key is patience—let it cool slightly before pouring the filling.