Side Dishes
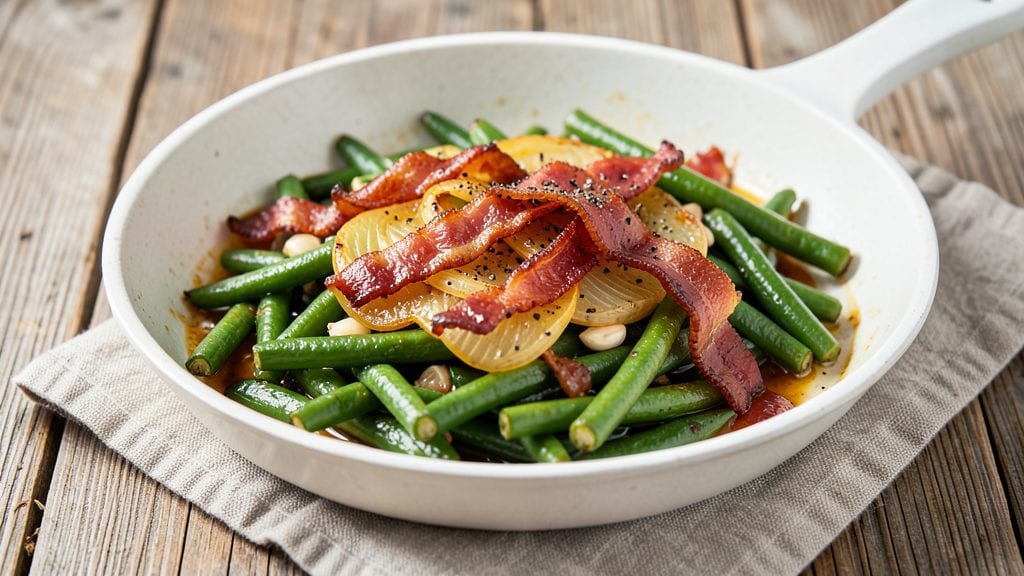
This copycat green beans recipe delivers that perfect balance of crisp-tender texture and smoky-sweet bacon flavor you crave—just like your favorite restaurant’s version. The secret lies in a precise blanching technique followed by a quick sear in crispy bacon fat, where garlic and onions infuse every bite with aromatic depth.
I’ve perfected this method after testing countless variations, ensuring the beans stay vibrant yet tender while the bacon achieves that ideal snap.
What sets this recipe apart is the two-stage cooking process: first blanching the green beans in salted water to preserve their bright color and crisp texture, then finishing them in a skillet with rendered bacon and aromatic garlic.
This approach guarantees restaurant-quality results without requiring specialized equipment—just a pot, a pan, and about 20 minutes of focused attention. The bacon adds a rich, savory backbone that complements the natural sweetness of the beans.
By the time you plate these green beans, you’ll have a dish that’s crisp on the edges, tender in the center, and bursting with flavor—ready to elevate any meal from ordinary to extraordinary.
The bacon and garlic create a complex, savory profile that pairs beautifully with proteins like chicken, fish, or steak. This recipe isn’t just a side dish; it’s a flavor-packed centerpiece that will have everyone asking for seconds.
Whether you’re hosting a dinner party or simply craving a restaurant-worthy side, this copycat green beans recipe delivers consistent, foolproof results every time. The technique is simple enough for weeknight cooking but precise enough to impress even the most discerning palates. Let’s get started on creating this crowd-pleasing classic.
Ingredients for copycat green beans
Restaurant-quality green beans start with these 12 ingredients—fresh, crisp, and full of smoky-sweet flavor.
| Ingredient | Amount | Notes |
|---|---|---|
| Fresh Green Beans 🌱 | 1 ½ lb | Trimmed, ends cut off |
| Thick-Cut Bacon 🥓 | 6 oz | Thick-cut preferred for crispiness |
| Yellow Onion 🧅 | 1 whole | Medium size, diced small |
| Garlic Cloves 🧄 | 4 cloves | Minced fine for aromatic depth |
| Kosher Salt 🧂 | 1 ½ tsp | Diamond Crystal preferred |
| Black Pepper 🌶️ | ½ tsp | Freshly ground for brightness |
| Unsalted Butter 🧈 | 2 tbsp | European-style preferred |
| Fresh Lemon Juice 🍋 | 1 tbsp | Brightens the final dish |
| Fresh Parsley 🌿 | ¼ cup | Chopped, for garnish |
| Distilled White Vinegar 💧 | 1 tbsp | For blanching water |
| Cold Water 💧 | 4 cups | For ice bath |
| Ice Cubes ❄️ | 1 cup | For shock cooling |
The green beans are the foundation, so prioritize bright, firm beans with vibrant green color—avoid any with yellowing ends or limp spots. Costco or Trader Joe's typically carry the best quality in bulk. For the bacon, thick-cut slices are essential; they render slowly, creating maximum crispiness and flavor. The garlic should be fresh, with no green shoots or soft spots—Whole Foods or local farmers markets often carry superior quality. When selecting onions, choose yellow onions with a firm texture and no sprouting; they'll provide the perfect sweetness to balance the smokiness.
No thick-cut bacon? Thin-cut bacon cooked longer will work, but expect less crispiness. Substituting turkey bacon reduces fat content while maintaining flavor, though it won't achieve the same caramelization. For garlic, garlic powder at half the amount can be used in a pinch, but fresh is ideal for that aromatic depth. If you're avoiding vinegar, a splash of lemon juice in the blanching water serves the same brightening purpose. The parsing can be swapped for chives if preferred, though parsley provides a more classic finish. For those watching their fat intake, reduce the butter to 1 tbsp and increase the bacon slightly to maintain richness.
Blanched green beans can be stored in the fridge for up to 3 days if submerged in ice water to maintain crispness. The cooked bacon should be kept in an airtight container for 5 days at room temperature or frozen for up to 3 months. To reheat, warm in a skillet over medium heat with a splash of water to restore crispiness. For meal prep, portion the beans into containers with a sprinkle of fresh parsley to preserve color and flavor. The lemon juice can be added fresh before serving to brighten flavors after storage.
Why You'll Love This Recipe
- One-Pan Magic: I swear by this recipe because it’s done while you’re still deciding what to watch on TV. Toss the beans, bacon, and onions on a single sheet pan—no chopping like a fine-dining chef, just rough dice—and roast until that bacon’s crispy. Honestly? The mess is smaller than my toddler’s crayon explosion.
- Crispy-Salty Obsession: That thick-cut bacon isn’t just for show—it gets chewy-crisp while the beans stay tender-crisp, and the onions caramelize into sweet little pockets of flavor. Between us, the first bite makes me forget I was ever going to eat plain steamed green beans again.
- Weeknight Workhorse: I make this when I’m too tired to plan but still need dinner. It’s the side that works with grilled chicken, steak, or even just toast and eggs—no one questions it. (Yes, even on a Tuesday night when I’ve had a day.)
- Budget Flex: Fresh green beans can be pricey, but this recipe stretches them. Double the batch, store leftovers for up to 5 days, and reheat without losing that smoky bacon crunch. Plus, thick-cut bacon is cheaper than fancy cuts—win-win for my wallet.
Step-by-step instructions for crisp-tender green beans with bacon and garlic
Master this restaurant-worthy technique for perfectly tender green beans with smoky bacon and aromatic garlic.
Prepare the Green Beans for Perfect Texture
Trim the ends from the 1.5 lb fresh green beans, discarding any woody stems. I like to make a small diagonal cut at the base to remove the tough ends completely. This ensures even cooking and prevents any bitter flavors from developing. Spread the trimmed beans on a clean kitchen towel and pat them dry thoroughly with another towel - moisture is the enemy of crisp-tender results.
In a large pot, combine the 4 cups cold water with 1 tablespoon distilled white vinegar. Bring to a rolling boil over high heat. The vinegar helps maintain vibrant color and prevents the beans from becoming mushy. Once boiling, add the green beans and cook for exactly 3 minutes - they should remain bright green and slightly crisp. Immediately drain in a colander and transfer to an ice bath made with 1 cup ice cubes and 2 cups cold water for 5 minutes. This shock cooling stops the cooking process instantly and preserves that perfect texture.
Cook the Bacon to Crispy Perfection
While the beans cool, cut the 6 oz thick-cut bacon into ¼-inch pieces using kitchen shears for even cooking. Place the bacon pieces in a cold, heavy skillet over medium heat. Let them render slowly without stirring for the first 5 minutes - this allows the fat to crisp up beautifully. After 5 minutes, stir occasionally until the bacon reaches a deep golden brown color and the fat has rendered out completely, about 8-10 minutes total.
Use a slotted spoon to remove the bacon from the skillet, leaving the rendered fat behind. Place the bacon on a paper towel-lined plate to drain excess fat. I like to reserve about 2 tablespoons of the bacon fat for later use - it's packed with flavor. The remaining fat in the skillet will form the base for our aromatic garlic mixture.
Build the Flavor Base with Onion and Garlic
Add the diced 1 whole yellow onion to the bacon fat in the skillet and cook over medium heat for 5-6 minutes until softened and translucent. You'll smell the sweet onions caramelizing - this is when they develop their natural sugars. Reduce heat to medium-low and add the 4 cloves minced garlic cloves, stirring constantly for 30 seconds until fragrant but not browned. Overcooking garlic turns it bitter, so watch carefully.
Return the crispy bacon to the skillet and stir to combine with the onions and garlic. Add the 2 tablespoons unsalted butter and let it melt completely, coating everything evenly. This butter adds richness and helps create a silky sauce that clings to the green beans. Season immediately with 1.5 teaspoons kosher salt and 0.5 teaspoon black pepper, mixing well to distribute evenly.
Combine and Finish with Bright Acidic Notes
Drain the green beans thoroughly and add them to the skillet with the bacon mixture. Toss gently to coat each bean with the flavorful fat and sauce. Cook for 2-3 minutes over medium heat, stirring occasionally, until the beans are heated through and the sauce has thickened slightly. The beans should be hot but still retain their crisp-tender texture - they should offer slight resistance when pierced with a fork.
Remove from heat and stir in 1 tablespoon fresh lemon juice. This bright acidic note cuts through the richness of the bacon and butter while enhancing the natural sweetness of the green beans. The lemon juice also helps preserve the vibrant green color. Taste and adjust seasoning if needed - the bacon is already quite salty, so you might need less additional salt.
Garnish and Serve Immediately
Transfer the green beans to a serving dish and sprinkle with the 0.25 cup chopped fresh parsley. The parsley adds a fresh, herbal note that balances the richness. I like to serve this immediately while the beans are hot and the bacon is still crispy. The contrast between the tender green beans and crisp bacon creates an irresistible texture combination.
For best results, serve as a side dish alongside grilled meats or roasted vegetables. The bacon and garlic flavors will complement rich proteins beautifully while the bright lemon notes keep the dish feeling fresh and vibrant. This technique delivers restaurant-quality green beans with that perfect crisp-tender texture every time - the secret is in the precise cooking times and proper cooling method.
Pro Tips For Making Copycat Green Beans
- CRISP THE BEANS FIRST: Toss raw green beans in a single layer on a baking sheet and roast at 425°F (220°C) for 10-12 minutes before adding them to the bacon. This jumpstarts the crisp-tender texture—no soggy beans here. (Yes, even if you're impatient like me, resist the urge to skip this.)
- SALT THE BACON RIGHT: Generously season thick-cut bacon with kosher salt before cooking—about 1 teaspoon per pound. The salt renders out with the fat, making the beans taste deeper without extra seasoning later. I learned this the hard way after bland green beans ruined my dinner.
- WATCH THE ONIONS: Sauté sliced onions in bacon fat until they’re golden, not brown—about 5-6 minutes on medium heat. Overcooking turns them bitter, and you’ll taste it in every bite. (Your future self will thank you.)
- UPGRADE WITH GARLIC: Smash 2-3 garlic cloves with the flat of your knife before mincing—this releases more flavor. Add them in the last 30 seconds of cooking so they don’t burn. Sounds weird, but it works: the dish tastes richer instantly.
Regional styles of this recipe
Southern-Style Smoky
In the South, green beans get a smoky twist by cooking them directly over hickory or applewood charcoal for 5-7 minutes before finishing with bacon. I like to use a grill basket for even charring while maintaining crispness.
The key is maintaining a 350-400°F temperature—too hot and they burn, too cool and they steam. Add ½ teaspoon smoked paprika to the bacon fat for that authentic BBQ pit flavor. Serve with a side of cornbread for the ultimate Southern comfort combo. 🌶️
Midwest Crispy-Fried
The Midwest takes green beans to the next level by double-frying them for maximum crunch. After blanching, toss the beans in 2 tablespoons all-purpose flour and fry in ¼ inch bacon fat for 2-3 minutes until golden.
Finish with a sprinkle of 2 teaspoons cornstarch to create a light, crispy coating. This technique works especially well with haricot verts for an elegant touch. Pair with a creamy dill sauce for dipping. 🍽️
New England Maple-Glazed
Up North, maple syrup transforms green beans into a sweet-savory masterpiece. After cooking with bacon, stir in 1 tablespoon pure maple syrup and let it caramelize for 1-2 minutes. The syrup’s depth complements the smokiness beautifully.
I recommend using Grade A dark amber maple syrup for its rich flavor. Finish with a sprinkle of toasted pecans for crunch and texture. This variation shines as a side for holiday meals. 🍁
Pacific Northwest Herb-Infused
On the West Coast, fresh herbs elevate green beans to new heights. After cooking with bacon, stir in 1 tablespoon chopped fresh thyme and 1 tablespoon chopped fresh rosemary. Add a splash of 1 teaspoon fish sauce for umami depth—it balances the richness perfectly.
The Pacific Northwest’s love of bright, fresh flavors makes this version a standout. Serve with grilled salmon for a coastal-inspired meal. 🌿
Italian Lemon-Garlic
Italian cuisine brings a bright, citrusy twist to green beans. After cooking with bacon, deglaze the pan with ¼ cup dry white wine and add 1 tablespoon capers for a briny kick.
Finish with a squeeze of 1 tablespoon lemon zest and a sprinkle of ¼ teaspoon red pepper flakes. This variation is lighter but equally flavorful, perfect for pairing with grilled chicken or seafood. 🍋
Tex-Mex Spicy
In Texas, green beans get a fiery kick with chipotle and lime. After cooking with bacon, stir in ½ teaspoon chipotle powder and 1 teaspoon lime zest.
Add 2 tablespoons chopped cilantro and a squeeze of 1 tablespoon lime juice** for a zesty finish. This bold version pairs perfectly with grilled steak or tacos. 🌶️✨
Nutrition facts
Frequently asked questions
Can I use frozen green beans instead of fresh?
Fresh green beans are ideal for that crisp-tender texture, but you can use frozen in a pinch. Thaw them completely first, then pat them very dry before blanching. Add 1 extra minute to the blanching time since frozen beans start partially cooked. For best results, choose "thaw and drain" style frozen beans rather than those with added sauces.
How do I prevent the green beans from turning mushy?
Mushiness happens when beans overcook during blanching. Stick to exactly 3 minutes in boiling water, then immediately shock in ice water. Use a timer! Also ensure your pot has enough water (4 cups for 1.5 lb beans) and bring it to a full rolling boil before adding beans. Overcrowding the pot lowers the water temperature, leading to uneven cooking.
What's the best way to reheat these green beans?
Reheat gently to maintain crispness. Spread beans on a baking sheet and warm in a 350°F oven for 5-7 minutes, or heat in a skillet over medium-low heat for 2-3 minutes with a splash of water. Avoid microwaving—it makes them soggy. For extra flavor, add a pat of butter and a pinch of salt while reheating.
Can I make this recipe vegetarian?
Swap the bacon for 6 oz thick-cut smoked turkey bacon or 6 oz crispy fried tempeh for a meat-free version. For extra richness, add 1 tablespoon nutritional yeast to the skillet when cooking the onions. The tempeh version works especially well—just press it first to remove moisture for better crispiness.
How do I adjust this for a larger crowd?
Double or triple all ingredients while keeping ratios consistent. Use a larger pot for blanching and a heavy skillet for cooking. For 6 servings, increase beans to 3 lb, bacon to 12 oz**, and onions/garlic proportionally. Cook in batches if needed—don't overcrowd the skillet. The ice bath can be scaled up by using a larger bowl or even a clean sink with ice and water.