
Side Dishes
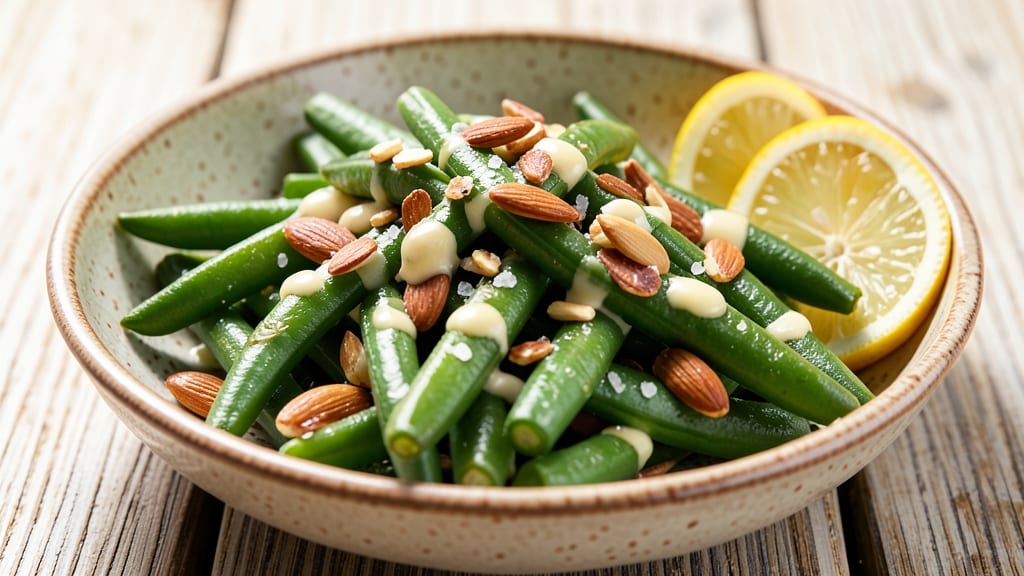
Nana's famous green beans recipe has been the star of every holiday table since I was a kid—crisp-tender with that perfect almond-garlic crunch that disappears too fast.
The secret lies in the balance: high heat for crisp edges, just enough time for tender centers, and toasted almonds that add a nutty finish. I still remember how Nana would shake the pan over the stove, listening for that satisfying sizzle that meant dinner was ready.
This recipe keeps the tradition alive with simple ingredients and a foolproof method that delivers restaurant-quality results at home. The garlic gets properly bloomed in butter before the beans hit the pan—this step transforms raw garlic into aromatic, mellow flavor that coats every bean.
Toasted almonds add texture and richness, while a splash of lemon brightens the dish at the end. It’s the kind of side that disappears before the main course even arrives.
What makes these green beans truly special is how they hold up—tender yet crisp—even after sitting for an hour. The almonds stay crunchy, the garlic flavor deepens, and the beans maintain that perfect bite.
This is the recipe that turns simple green beans into a showstopper, the one your family will ask for year after year. Let’s bring Nana’s kitchen to yours.
Pair these with roasted chicken, ham, or even grilled steak—they’re versatile enough for any meal. The best part? You can make them ahead and reheat without losing that crisp-tender magic. Here’s how to recreate the magic of Nana’s kitchen in your own.
Ingredients for nana's famous green bean
Simple ingredients that transform into Nana's legendary crisp-tender green beans.
| Ingredient | Amount | Notes |
|---|---|---|
| Fresh Green Beans 🥦 | 1 ½ lb | Trimmed, ends cut off |
| Unsalted Butter 🧈 | 4 tbsp | Cold, cubed for blooming garlic |
| Garlic Cloves 🧄 | 4 cloves | Peeled, thinly sliced |
| Sliced Almonds 🥜 | ½ cup | Toasted until golden |
| Lemon Juice 🍋 | 1 tbsp | Freshly squeezed |
| Salt 🧂 | ¾ tsp | Kosher or sea salt |
| Ground Black Pepper 🌶️ | ¼ tsp | Freshly cracked |
| Extra-Virgin Olive Oil 🫒 | 1 tbsp | For tossing beans |
| Fresh Parsley 🌿 | ¼ cup | Chopped, for garnish |
The green beans should be bright green and crisp—avoid anything rubbery or yellowing. I always grab Trader Joe's or Whole Foods for the freshest, but the regular grocery store works too if you pick them up within a day. The almonds? Store-bought sliced almonds are fine, but toasting them yourself (just 3-4 minutes in a dry pan) makes all the difference. Nana swore by garlic from the bulk bins—it had more flavor than the pre-minced stuff. For the butter, grab European-style if you can find it (like Plugrá), but regular unsalted works perfectly fine. The lemon juice should be freshly squeezed—bottled just won't cut it here.
No fresh parsley? Dried parsley at half the amount works in a pinch, but fresh is worth hunting down at the market. Running low on almonds? Pecans or walnuts toast just as nicely, though the flavor changes slightly. The garlic gets bloomed in butter first—this step is non-negotiable—it transforms raw garlic into something sweet and aromatic. If you're short on time, you can sauté the garlic with the beans, but you'll lose that depth of flavor. The green beans can be blanched ahead of time (just plunge them in ice water), which saves time on busy nights.
These green beans reheat beautifully—just warm them in a pan with a splash of water for 2-3 minutes to keep that crisp-tender texture. Store them in an airtight container in the fridge for up to 3 days, but they're best served fresh. The toasted almonds stay crispy for about 5 days if stored in a sealed container. I always make a double batch—one for dinner and one to freeze for lazy weeknights. Nana's trick was to shake the pan constantly while cooking, which gives those perfect crisp edges without burning the beans.
Why You'll Love This Recipe
- Five-Ingredient Magic: The pantry already has these—no fancy shopping needed. Fresh green beans, butter, garlic, almonds, and lemon juice? That’s it. I swear, I’ve made this while juggling work calls and still ended up with something that tasted like a restaurant side.
- Crispy-Creamy Contrast: That buttery garlic coating on the green beans? Irresistible. Then the toasted almonds add crunch, and the lemon juice cuts through it all—bright, tangy, and just the right amount of richness. It’s the kind of dish where every bite feels like a little victory.
- Weeknight or Holiday Table: I’ve served this as a simple side for my husband’s takeout nights and as the star at Thanksgiving. The almonds make it feel special enough for company, but the prep is so easy I don’t stress. (Yes, even on a Tuesday night.)
- Leftovers That Don’t Let You Down: Unlike some dishes that turn sad in the fridge, these green beans actually taste better the next day. Reheat them with a splash of water, and they’re just as crispy and flavorful. Bonus: They’re cheap to make, so I can feed the whole family without breaking the bank.
Step-by-step instructions for Nana's famous green beans recipe
Here's how to transform simple green beans into Nana's legendary crisp-tender almond garlic masterpiece.
Trim and Blanch the Green Beans
Start by rinsing the 1.5 lb fresh green beans under cold water to remove any dirt. Using a sharp knife, trim off the tough ends - you'll want about 1 inch removed from each stem end. Cut the beans into 2-inch pieces for even cooking.
Bring a large pot of salted water to a rolling boil. Add the trimmed green beans and cook for exactly 4 minutes - they should be bright green but still slightly crisp. Drain immediately in a colander and plunge into an ice bath for 30 seconds to stop the cooking process. This blanching preserves their vibrant color and crisp texture while making them tender enough to absorb the flavorful almond butter sauce.
Toast the Almonds and Bloom the Garlic
In a dry skillet over medium heat, toast the 0.5 cup sliced almonds for 3-4 minutes until they're fragrant and just beginning to turn golden. Watch them closely - they'll darken quickly. Remove the almonds and set aside on a paper towel.
In the same skillet, reduce heat to medium-low and add the 4 tbsp cold cubed unsalted butter. Let it melt completely, then add the 4 peeled, thinly sliced garlic cloves. Cook for 1-2 minutes until the garlic is golden and fragrant - you'll smell that heavenly aroma that makes this dish special. Be careful not to let the garlic burn, as it can quickly turn bitter.
Create the Almond Butter Sauce
Return the toasted almonds to the skillet with the garlic butter. Add the 0.75 tsp salt and 0.25 tsp ground black pepper, stirring constantly for 1 minute until everything is well combined. Remove from heat and stir in the 1 tbsp freshly squeezed lemon juice. This brightens the flavors and balances the richness of the butter and almonds.
The sauce should be thick and creamy - almost like a rich almond butter. If it's too thick, you can add a splash of water to loosen it slightly. The lemon juice will make the sauce glisten and give it that fresh, vibrant quality that makes this recipe so special.
Toss and Finish the Green Beans
In a large bowl, combine the blanched green beans with the almond butter mixture. Add the 1 tbsp extra-virgin olive oil and toss everything together gently but thoroughly. The beans should be coated evenly with the almond butter sauce but still retain their individual shape.
Let the green beans sit for 5 minutes to allow the flavors to meld together. This resting time is crucial - it lets the beans absorb the almond butter completely while keeping them tender-crisp rather than mushy. The lemon juice will help maintain their bright green color while adding a subtle tang that cuts through the richness.
Garnish and Serve Immediately
Transfer the green beans to a serving dish and sprinkle with the 0.25 cup chopped fresh parsley. The parsley adds a fresh, herby note that contrasts beautifully with the rich almond butter. Toss everything together one last time just before serving to distribute the parsley evenly.
Serve immediately while the beans are still warm and the almond butter sauce is at its peak flavor. This dish is best enjoyed right away when the beans are crisp-tender and the sauce is still glossy. The combination of toasted almonds, garlic, lemon, and parsley creates a flavor profile that's both sophisticated and comforting - just like Nana's famous recipe!
Pro Tips For Making Nana'S Famous Green Bean
- Trim the Beans Right: Cut off the ends at a 45-degree angle—just past where the stem meets the bean. I learned this the hard way when my beans kept slipping off the fork, and it also lets them cook faster. (Yes, it looks fussy, but it’s worth it.)
- Cook in Batches: Crowd the pan, and you’ll steam the beans instead of searing them. Work in single layers over medium-high heat—this gives them that perfect char without turning to mush. (Your future self will curse you if you skip this.)
- Toast Almonds First: Dry-toast the sliced almonds in the same pan for 30 seconds before adding butter. This keeps them crispy instead of soggy from the green beans’ moisture. (I know, I know—it’s one more step, but it’s the thing that matters most.)
- Finish with Butter Slow: After the garlic and beans cook, pull the pan off heat before adding the butter. Reheat gently—this melts the butter without burning it, so every bite gets that rich, nutty flavor. (Sounds weird, but it works.)
Common mistakes when making this recipe
Overcooking the Beans
Nana always stressed that green beans should be crisp-tender, not mushy. The biggest mistake is overcooking during blanching or sautéing. If your beans turn bright green but still have a slight crunch after blanching, you're golden.
If they're limp, you've gone too far. I've ruined batches by letting them sit in boiling water too long—stick to exactly 4 minutes for blanching, no more. 🥦
Skipping the Garlic Bloom
This is a non-negotiable step! Many cooks add raw garlic directly to the pan, but that leads to bitter, underdeveloped flavor. Always bloom your garlic in butter first—this transforms raw garlic into sweet, aromatic perfection.
I've seen people rush this step, only to end up with beans that taste like they're missing something. Take your time and let that garlic cook until golden. 🧄
Using Old or Stale Almonds
Freshly toasted almonds make all the difference. If you're using store-bought sliced almonds that have been sitting in your pantry for months, they'll lose their crunch and flavor. Toast them fresh for 3-4 minutes until golden and fragrant.
I keep a small bag of almonds in the freezer to ensure they stay fresh longer. Stale almonds turn the dish from gourmet to generic. 🥜
Not Enough Shaking
Nana had a secret technique—she'd shake the pan constantly while cooking the beans to get those perfect crisp edges. If you're not shaking your pan over medium-high heat, your beans will steam instead of sear, resulting in soggy, flavorless sides.
Give your pan a good shake every 10-15 seconds to ensure even browning. This is what gives the dish that signature texture. 🔥
Adding Lemon Too Early
Lemon juice brightens the dish, but adding it too soon can make the beans turn dull green and watery. Always stir in the 1 tbsp lemon juice right before serving. This preserves the vibrant color and ensures the acidity cuts through the rich almond butter at the perfect moment.
I've seen people add it during cooking, and it ruins the texture. 🍋
Ignoring the Resting Time
Letting the beans sit for 5 minutes after tossing with the sauce might seem counterintuitive, but it's crucial. This resting period allows the flavors to meld and the beans to absorb the almond butter without turning mushy.
I've rushed this step and ended up with a soggy mess. Trust the process—it's what makes Nana's green beans legendary. ⏳
Nutrition facts
Frequently asked questions
Can I use frozen green beans instead of fresh?
Yes, but with adjustments! Thaw frozen beans first, then pat them completely dry before blanching. Since frozen beans are already cooked, reduce blanching time to 2 minutes instead of 4 minutes. The texture will be slightly softer, but still delicious. For best results, use high-quality frozen beans with no added preservatives.
What if I don't have almonds?
No problem! Swap in pecans or walnuts for a richer flavor, or use toasted breadcrumbs for a gluten-free option. If you're avoiding nuts entirely, try crispy fried onions or toasted pumpkin seeds for texture. Just adjust the toast time—nuts burn faster than seeds.
How do I make this recipe ahead of time?
Blanch and toss the beans with the almond butter sauce up to 2 days ahead, storing in an airtight container. Reheat gently in a skillet with 1 tbsp butter for 3-4 minutes, shaking constantly to restore crispness. Skip the lemon juice until reheating to preserve brightness. The almonds stay crispy if stored separately.
Can I make this dish vegetarian?
Skip the butter and use olive oil or vegan butter instead. For extra richness, add 1 tbsp nutritional yeast when tossing with the beans. The garlic, lemon, and almonds keep it flavorful without any animal products. This version works perfectly with veggie burgers or roasted potatoes.
Why did my beans turn mushy?
Overcooking is the most common cause! Check your blanching time (4 minutes max) and avoid crowded pans during sautéing. Another tip: Don't skip the ice bath after blanching—it stops cooking immediately. If reheating, use high heat for 2-3 minutes with constant shaking to restore crispness.