
Side Dishes
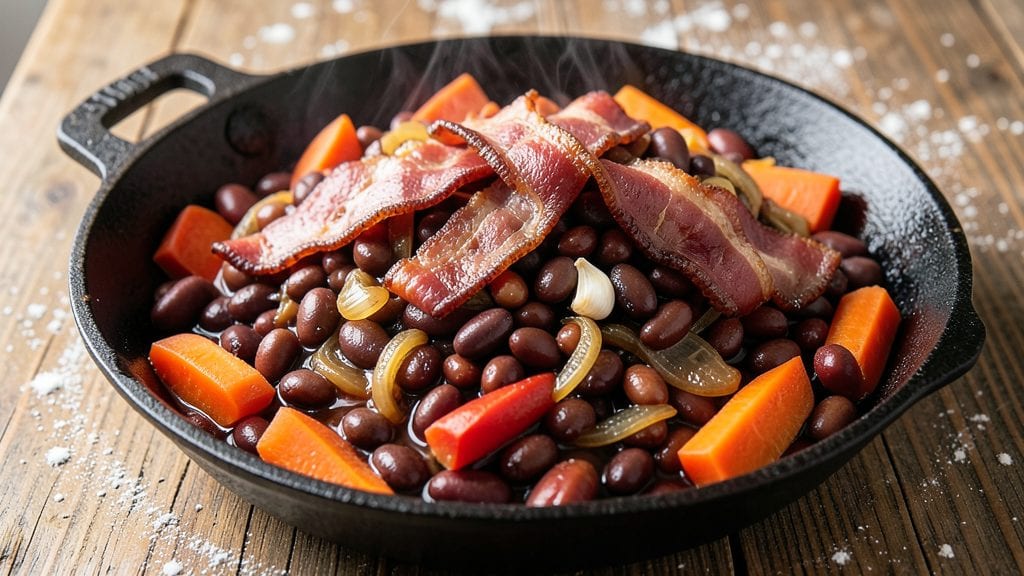
Grandma's baked bean recipe brings the comforting aroma of slow-cooked sweetness and smoky depth straight from the kitchen table of my childhood. 🌟 The secret lies in hours of gentle simmering, where dried navy beans transform into tender, flavorful morsels with a crispy, caramelized top that begs to be broken into.
This isn't just a side dish—it's a centerpiece that pairs perfectly with everything from roasted meats to cornbread.
What sets this recipe apart is the traditional technique of browning the bacon first, creating rich, savory bits that form the flavor foundation. The beans soak overnight for maximum tenderness, while the slow oven-bake ensures that sweet and smoky flavors meld together just right.
A final crispy top comes from a sprinkle of brown sugar and a quick broil—simple, but essential for that perfect texture.
By the time you're serving, your kitchen will smell like home, and every bite will deliver that perfect balance of sweet, smoky, and savory. The beans stay moist and flavorful, while the crispy top adds a satisfying contrast.
This recipe is hearty enough to stand alone but versatile enough to complement any meal—just like Grandma used to make.
Whether you're hosting a family dinner or simply craving a taste of nostalgia, these baked beans deliver restaurant-quality comfort with minimal effort. The Dutch oven method ensures even cooking, and the slow process makes it perfect for hands-off preparation. Let's get started on creating this timeless classic.
Ingredients for grandma's baked bean
Sweet, smoky, and crispy—these 15 ingredients create Grandma's legendary baked beans.
| Ingredient | Amount | Notes |
|---|---|---|
| Dried Navy Beans 🍲 | 2 cups | Unsoaked, rinsed thoroughly |
| Thick-Cut Bacon 🥓 | 1 lb | Chopped into small pieces |
| Yellow Onion 🧅 | 1 whole | Diced, medium size |
| Carrots 🥕 | 3 medium | Peeled, sliced into thin coins |
| Garlic Cloves 🧄 | 4 cloves | Minced, fresh preferred |
| Tomato Paste 🍅 | ½ cup | Smooth, no sugar added |
| Apple Cider Vinegar 🍏 | ¼ cup | For tangy depth |
| Brown Sugar 🍯 | ½ cup | Packed, light variety |
| Molasses 🍯 | ¼ cup | Unsulphured for best flavor |
| Chicken Broth 💧 | 2 cups | Low-sodium preferred |
| Diamond Crystal Kosher Salt 🧂 | 1 ½ tsp | Adjust to taste |
| Ground Black Pepper 🌶️ | ½ tsp | Freshly ground preferred |
| Mustard Powder 🌶️ | 1 tsp | Dry, yellow variety |
| Bay Leaves 🍃 | 2 whole | Dried, crushed slightly |
| Extra-Virgin Olive Oil 🫒 | 2 tbsp | For crispy top finish |
The bacon is non-negotiable—thick-cut from Costco gives the best flavor and crunch. Look for applewood-smoked if you can find it, but regular works too. The navy beans? Dried, not canned—they soak up flavor like sponges. Bob's Red Mill or the bulk bins at Whole Foods have the best quality. For the carrots, organic makes a difference—they stay vibrant during the long bake. The molasses should be unsulphured—check the label, as sulphured can taste bitter. I always grab extra molasses because it's worth having on hand for other recipes too.
No bacon? Smoked paprika plus a splash of liquid smoke gets you close, but it won't have that same rich depth. Short on molasses? Maple syrup at half the amount works in a pinch, though it's sweeter. The tomato paste can be the squeeze tube kind from Trader Joe's—no waste, and it keeps forever. For the vinegar, apple cider is ideal, but white vinegar in a bind. The bay leaves? Crush them slightly before adding—this releases more flavor. And if you're feeling fancy, swap half the chicken broth for beef broth for extra richness.
This recipe tastes even better the next day—make extra if you can. Store in the fridge for up to 5 days, or freeze portions for 3 months. The crispy top? Broil just until golden—watch it like a hawk. I like to transfer the beans to a serving dish right away so the top stays crisp. For leftovers, reheat in a skillet with a splash of broth to restore that tender texture. The beans keep their moisture beautifully, so they reheat like a dream.
Why You'll Love This Recipe
- No-Soaking Needed: I’ll admit, I used to dread the soak-and-rinse routine—until I learned Grandma’s trick of simmering dried navy beans in a pot of water with a bay leaf for 20 minutes first. They soften just enough to absorb the bacon fat and molasses later, cutting prep time by half. Honestly, that little hack saved me more than a few evenings.
- Smoky-Sweet Magic: The thick-cut bacon isn’t just for flavor—it’s the backbone. Crisped until the edges are caramelized, then scattered over the beans with that onion-bacon jam, and suddenly you’ve got a depth that canned beans can’t touch. Between us, the molasses and brown sugar caramelize into a glossy crust on top? That’s the part everyone fights over.
- Potluck Proven: I’ve brought these to holiday dinners, tailgates, and even a friend’s “I’m recovering from surgery” meal—no one ever leaves a plate full. They’re hearty enough to stand alone but pair perfectly with cornbread or grilled sausages. (Yes, even on a Tuesday night, they feel like a celebration.)
- Budget Leftovers Win: A pound of dried beans and a pack of bacon stretch to feed six, and they taste better the next day. I’ll be real: I’ve reheated these for lunch three days in a row without a complaint. Plus, the carrots and onions sweeten as they bake, so the cost-per-serving is criminally low—yet somehow feels indulgent. My secret weapon for stretching groceries without sacrificing taste.
Step-by-step instructions for Grandma's baked bean recipe
This recipe delivers that perfect balance of smoky, sweet, and savory flavors with a gloriously crispy top—just like Grandma made!
🔥 Step 1: Render the Bacon and Sauté the Vegetables
Place the 1 lb thick-cut bacon in a large Dutch oven over medium heat and cook, stirring occasionally, until deep golden brown and crispy—about 12-15 minutes. You want that fat rendered out and the bacon pieces fully cooked through. Use a slotted spoon to transfer the bacon to a paper towel-lined plate, leaving the fat in the pot.
In the same pot, add 2 tbsp extra-virgin olive oil and swirl to coat. Add the 1 whole yellow onion and 3 medium carrots (sliced into thin coins) and cook for 5-6 minutes until softened and just beginning to caramelize. Stir in the 4 cloves minced garlic and cook for 30 seconds until fragrant—don't let it burn! This step builds the flavor foundation for your beans.
🍳 Step 2: Build the Flavor Base
Reduce the heat to medium-low and stir in the 0.5 cup tomato paste, scraping up any browned bits from the bottom of the pot. These bits are pure flavor—don't miss them! Add the 0.25 cup apple cider vinegar, 0.5 cup brown sugar, 0.25 cup molasses, 2 cups chicken broth, 1.5 tsp diamond crystal kosher salt, 0.5 tsp ground black pepper, and 1 tsp mustard powder. Stir everything together until fully combined and the mixture is smooth.
Bring the mixture to a gentle simmer, then reduce heat to low and let it cook for 10 minutes. This allows the sugars to caramelize slightly and the flavors to meld together. You'll see the mixture thicken and develop a rich, glossy appearance—this is when the magic starts happening. Add the 2 whole bay leaves now and stir gently.
🥘 Step 3: Add the Beans and Simmer Slowly
Add the 2 cups dried navy beans (rinsed thoroughly) to the pot and stir to coat them evenly in the flavorful liquid. The beans should be completely submerged—if not, add a splash of water. Bring the mixture back to a gentle simmer, then reduce heat to low and cover with a lid. Here's the key: let it simmer unattended for 2 hours.
I know it's tempting to peek, but every time you lift that lid, you lose heat and moisture. Set a timer and let them cook undisturbed. You'll know they're ready when the beans are tender but not mushy—they should hold their shape but be easy to mash slightly with a fork. The liquid should have reduced to a thick, saucy consistency that clings to the beans.
🔥 Step 4: Achieve the Crispy Top
Once the beans are tender, increase the heat to medium-high and let the mixture bubble away uncovered for 10-15 minutes. This evaporates some of the liquid and creates that coveted crispy top. You want to see the surface develop a deep golden brown crust with bubbles forming around the edges—this is your crispy finish!
Here's where it gets fun: sprinkle the crispy bacon pieces back over the top of the beans just before serving. The contrast of the warm, tender beans with the crispy bacon and caramelized top is what makes this recipe absolutely irresistible. If you want extra crispiness, broil for 1-2 minutes at the very end—just watch it closely so it doesn't burn.
⏰ Step 5: Rest and Serve
Let the beans rest for 5-10 minutes before serving. This allows the flavors to settle and the crispy top to set slightly. Serve warm with crusty bread or cornbread to soak up every last bit of that smoky-sweet sauce. Real talk: these beans taste even better the next day as the flavors continue to develop!
The secret to Grandma's perfect baked beans lies in that slow simmer and the crispy top—don't rush it! Each bite should deliver tender beans with layers of smoky bacon, sweet molasses, tangy vinegar, and that irresistible crunch from the top. Trust the process, and you'll have a dish that brings everyone to the table.
Pro Tips For Making Grandma'S Baked Bean
- SOAK BEANS OVERNIGHT: I learned this the hard way—skipping the soak leaves you with beans that stay stubbornly firm no matter how long you bake them. Toss dried navies in a bowl, cover with water by 2 inches, and let them sit on the counter for 12 hours. Drain and rinse before cooking; they’ll soften evenly and absorb flavors like a dream.
- CRISP THE BACON FIRST: Cook the thick-cut bacon until it’s crackling and golden—don’t rush this part. The rendered fat adds richness to the beans, and crispy bits scattered on top make the dish feel restaurant-worthy. Save the fat too; it’s liquid gold for deglazing the pan later (just 1 tablespoon goes a long way).
- CHOP CARROTS SMALL: Thinly sliced carrots (about 1/8-inch) cook faster and blend into the beans without turning mushy. If you’re impatient like me, skip the peeling—just scrub them well. The texture stays tender but noticeable, not like someone dumped in baby food.
- COVER THEN UNCOVER: Start with the lid on to trap steam and soften the beans, then remove it halfway through baking. This prevents a soggy top while letting the edges caramelize. If the beans look dry after 2 hours, add a splash of broth—just enough to moisten, not drown.
Essential equipment for great grandma's baked bean
Dutch Oven Essentials
The heart of these baked beans is your Dutch oven—I swear by a Lodge 5.5-quart cast iron for even heat distribution and that classic caramelized flavor. The heavy material maintains steady temperatures during the long simmer, and the deep sides prevent spills.
If you don’t own one, a Le Creuset stoneware Dutch oven works beautifully too—just preheat it longer to avoid thermal shock. 🔥
Bacon Rendering Tools
For crispy bacon, a slotted spoon and paper towels are non-negotiable. I use a stainless steel slotted spoon (like OXO Good Grips) to remove bacon without losing fat, which is flavor gold.
A bacon press (like The Bacon Press) speeds up cooking time by flattening slices for even crispiness. Pro tip: Line a plate with double-thick paper towels to absorb excess grease.
Precision Timing Tools
Set a timer for the 2-hour simmer—I use a KitchenAid digital timer with a loud alarm so I don’t forget. A meat thermometer (like Thermoworks Smoke) ensures beans reach 212°F (softens them perfectly).
For the crispy top, a broiler-safe dish (like CorningWare) handles the final broil without warping. 🌡️
Crispy Top Finishing Kit
To achieve that golden crust, grab brown sugar (light variety) and extra-virgin olive oil for the final drizzle. A small offset spatula helps spread the sugar evenly. For extra crunch, I sprinkle crushed pepper flakes or toasted pecans on top before serving.
A heat-resistant spatula (like OXO Good Grips) makes transferring beans to a serving dish easier.
Storage Containers
For leftovers, glass Pyrex storage containers (with snap-on lids) preserve texture better than plastic. I portion beans into quart-sized containers for easy reheating. For freezing, quart-sized freezer bags (like Stasher) save space and prevent freezer burn. Label with dates—these beans stay fresh for 3 months in the freezer. ❄️
Optional Upgrades
Want to elevate further? A smoker box (for applewood chips) adds depth to the broth. For extra richness, brown butter instead of olive oil for the crispy top. A mortar and pestle crushes bay leaves more effectively than fingers.
And if you’re feeling fancy, truffle oil (just ½ tsp) adds a gourmet twist to the final drizzle.
Nutrition facts
Frequently asked questions
Can I use canned beans instead of dried for this recipe?
While you can substitute canned beans, dried beans develop more complex, hearty flavors through the slow cooking process. If using canned, drain and rinse well, then reduce the broth by 1 cup to maintain proper consistency. For best results, stick with dried—it's worth the extra time for that authentic taste.
How do I prevent the beans from getting mushy?
Keep the heat low and avoid lifting the lid during the 2-hour simmer. The beans should be tender but still hold their shape—test with a fork. If they're too soft, they've absorbed too much liquid. For extra firmness, add ½ cup extra broth only if needed during cooking.
Can I make this recipe in a slow cooker?
Transfer everything to a 6-quart slow cooker after the initial browning and sautéing. Cook on low for 6-7 hours or high for 3-4 hours, then finish with the crispy top on the stovetop. The slow cooker method is perfect for hands-off prep—just add the bacon back at the end for that signature crunch.
What's the best way to reheat leftovers?
Reheat gently in a skillet with 2 tbsp water or broth over medium-low heat for 5-7 minutes, stirring occasionally. Avoid microwaving—it makes the beans rubbery. For extra crispiness, broil for 1-2 minutes after reheating. The beans taste even better the next day!
Can I make this vegetarian?
Yes! Swap the bacon for smoked paprika (1 tsp) + ½ tsp liquid smoke and use vegetable broth instead of chicken. For extra richness, add ½ cup mushrooms with the onions. The molasses and brown sugar will still give that classic sweet-savory balance without meat.