
Side Dishes
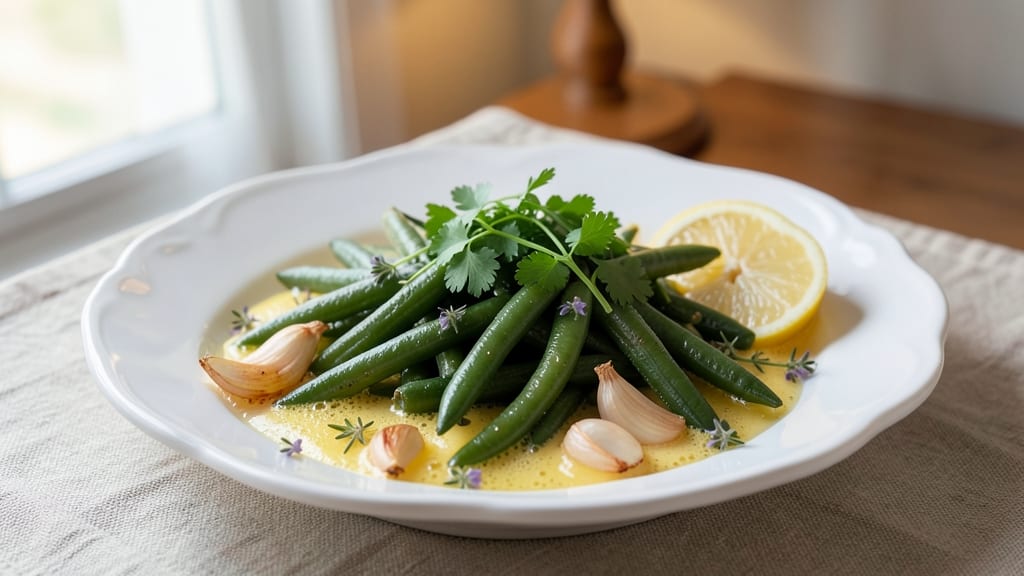
This canned French green beans recipe turns pantry staples into a restaurant-worthy side in just 15 minutes with simple tricks for extra crunch and brightness. This recipe preserves the beans' signature al dente texture while infusing them with bright garlic-herb flavors that cut through richer main dishes.
I developed it after discovering how canned beans could rival fresh when properly seasoned and cooked—no fancy equipment required.
The secret lies in two key steps: sautéing the beans in butter until they develop a golden sheen (not overcooked), then finishing with a quick infusion of garlic, lemon zest, and fresh herbs.
This method ensures they retain their satisfying bite while absorbing rich, aromatic flavors. The process is straightforward but makes a world of difference compared to plain canned beans straight from the pantry.
What you'll end up with is a side dish that's crisp-tender, vibrant green, and bursting with garlic-herb brightness—perfect for complementing grilled meats, roasted chicken, or even as a standalone vegetarian meal.
The beans stay al dente with just the right amount of crunch, while the garlic and lemon create a tangy contrast that makes every bite satisfying. This is the kind of side that transforms ordinary meals into something special.
Serve warm alongside your favorite proteins or over a bed of rice for a complete meal. The recipe scales easily for parties or leftovers, and the flavors only deepen as it sits. Ready to make the most of canned French green beans? Let's get started with this foolproof technique.
Ingredients for canned french green beans
Pantry staples meet restaurant-quality technique—just 11 ingredients transform canned beans into vibrant, al dente perfection.
| Ingredient | Amount | Notes |
|---|---|---|
| Canned French Green Beans 🌱 | 14 oz | Drained, stems trimmed |
| Unsalted Butter 🧈 | 3 tbsp | Cold, cut into small cubes |
| Garlic Cloves 🧄 | 3 cloves | Thinly sliced, not minced |
| Fresh Lemon 🍋 | 1 whole | Zest only, about 1 tsp |
| Fresh Flat-Leaf Parsley 🌿 | ¼ cup | Chopped, stems included |
| Fresh Thyme Leaves 🌿 | ¼ tsp | Or 1/8 tsp dried thyme |
| Sea Salt 🧂 | ½ tsp | Fine grain preferred |
| Ground Black Pepper 🌶️ | ¼ tsp | Freshly cracked preferred |
| Olive Oil 🫒 | 1 tbsp | For finishing, optional |
| Red Wine Vinegar 🍷 | 1 tsp | For brightness, optional |
| Toasted Almonds 🥜 | 2 tbsp | Sliced, for garnish |
The beans are the foundation, so choose high-quality canned French green beans—brands like Del Monte Select or Green Giant hold their shape best. Look for cans with no dents and a recent date code. Fresh herbs elevate the dish, but if you're short on time, dried thyme at one-third the amount works in a pinch. The butter is non-negotiable—it creates that golden sheen that signals restaurant-quality. Use European-style butter like Plugrá or Kerrygold for richer flavor, but regular unsalted butter works perfectly fine. Thinly sliced garlic preserves its aroma better than minced, and zesting the lemon fresh adds a brightness that bottled juice can't match.
No fresh parsley? Fresh basil or cilantro works in a similar pinch, though the flavor profile shifts slightly. Short on thyme? Dried oregano at half the amount gives a Mediterranean twist. Want extra crunch without nuts? Toasted breadcrumbs or crispy fried shallots add texture beautifully. The olive oil and red wine vinegar are finishing touches—skip them if you prefer a simpler profile, but together they create that signature tangy contrast. For a vegetarian version, add a splash of vegetable broth when sautéing to deepen the flavor without relying on meaty elements. The beans should always remain crisp-tender, so avoid overcrowding the pan during cooking.
Store cooked beans in an airtight container with a paper towel pressed on top to absorb moisture—keeps them crisp for 4 days in the fridge. For longer storage, freeze in a single layer before transferring to a bag for up to 3 months. Reheat gently in a skillet with a splash of water or broth to restore that golden sheen. Garnishes like toasted almonds or extra herbs can be added fresh after reheating. This dish reheats beautifully, making it perfect for meal prep—just toss with a little olive oil and fresh lemon zest before serving.
Why You'll Love This Recipe
- No-Chop Needed: I swear by this trick—just drain the beans, toss them in butter, and let the garlic sizzle. Three minutes later, dinner’s ready. (Yes, even on nights when I’d rather watch TV.)
- Bright & Buttery Magic: That lemon zest and parsley? They turn canned beans into something restaurant-worthy. The butter melts into crisp-tender edges, while the garlic adds a punch—simple, but ridiculously good.
- Meal Prep MVP: I make a big batch on Sundays, store it in the fridge, and reheat portions for lunches all week. Add to sandwiches, pasta, or eggs—it’s my go-to for lazy days.
- Budget-Friendly Luxury: Fresh green beans cost a fortune, but these canned ones? Same flavor, half the price. I buy them in bulk, and the butter/lemon combo makes it taste like a splurge—without the guilt.
Step-by-step instructions for al dente green beans with garlic-herb brightness
Transform simple canned green beans into a restaurant-worthy side dish with this straightforward method.
Prepare the Beans and Butter
Drain the 14 oz canned French green beans thoroughly, then trim any remaining stems with kitchen shears. Rinse under cold water to remove any excess sodium. In a large skillet, melt the 3 tbsp unsalted butter over medium heat until it foams but doesn't brown. You'll want the butter to be hot enough to gently sizzle when the beans hit the pan.
Here's the thing—don't rush this step. The butter needs to be fully melted and coating the pan evenly. If it looks like it's struggling to melt, reduce the heat slightly. You're aiming for a smooth, liquid butter that will crisp the beans beautifully without burning. The butter's flavor will infuse into the beans as they cook, creating that rich, buttery foundation.
Sauté the Garlic and Season
Add the 3 thinly sliced garlic cloves to the melted butter and cook for 30-45 seconds until they become just fragrant—not browned. You'll know it's ready when the kitchen smells like fresh garlic but you don't see any color change. Immediately add the drained green beans and stir to coat them evenly in the garlic butter.
Sprinkle the beans with the 0.5 tsp sea salt and 0.25 tsp ground black pepper, then toss to distribute the seasoning. I like to press the beans down gently with a spatula for a minute or two—this ensures even contact with the pan and prevents them from sticking. The beans will start to soften slightly at the edges, but you're not looking for complete tenderness yet.
Finish with Herbs and Acid
Cook the beans for 4-5 minutes total, stirring occasionally, until they're heated through and just beginning to crisp at the edges. Add the 0.25 tsp fresh thyme leaves and the zest from 1 whole lemon (about 1 tsp). Stir gently to combine, letting the thyme infuse its earthy aroma into the beans.
Remove the skillet from heat and stir in the 0.25 cup chopped parsley and 1 tsp red wine vinegar. The vinegar brightens the dish, cutting through the richness of the butter. Taste and adjust seasoning if needed—you might want to add a pinch more salt or a squeeze of lemon juice for balance. The beans should be al dente with a satisfying crunch, not mushy.
Garnish and Serve
Transfer the green beans to a serving platter and drizzle with the 1 tbsp olive oil if using. Sprinkle the 2 tbsp toasted almonds evenly over the top for added texture and crunch. The almonds add a nice contrast to the tender beans and bring an element of sophistication to the dish.
Serve immediately while the beans are still warm and vibrant. The combination of buttery beans, fragrant garlic, bright lemon, and crunchy almonds creates a perfect balance of flavors and textures. This dish pairs beautifully with grilled meats, roasted chicken, or even as a standalone vegetarian option. The key is keeping everything fresh and serving it promptly—these beans don't reheat well.
Pro Tips For Making Canned French Green Beans
- Drain, Rinse, Repeat: Open the can and dump those beans straight into a colander—don’t just pour them into the pan. The brine clings like glue, turning your butter into a sad, watery mess. A quick rinse under cold water cuts the salt and keeps the beans from tasting like a pickle jar.
- Sauté Garlic Low: After draining the beans, toss them into the pan with butter over medium heat. Let them warm for 30 seconds before adding garlic—high heat burns garlic faster than you can blink. Medium-low keeps it golden without turning it to ash.
- Lemon Zest First: Grate the lemon zest before squeezing the juice. Toss the zest into the pan with the beans and garlic—it blooms instantly, adding bright flavor that just sitting in juice can’t match. Save the juice for finishing.
- Butter in Stages: Start with half the butter to coat the beans, then add the rest after garlic. This prevents splattering when the garlic hits the pan and ensures every bite gets that rich, buttery finish—no dry patches here.
Essential equipment for great canned french green beans
Skillet Essentials
Start with a 10-12 inch non-stick skillet—I recommend All-Clad Stainless Steel for even heat distribution and durability. The non-stick surface prevents the beans from sticking to the pan while developing that golden sheen.
If you don’t have non-stick, a well-seasoned cast iron skillet like Lodge works beautifully and adds a subtle smoky depth to the dish. 🔥
Butter Quality Matters
Use unsalted butter (like Plugrá or Kerrygold) because it gives you full control over seasoning. Salted butter can make the dish too salty, especially if your canned beans already have added sodium.
Cut the butter into small cubes before adding to the pan—this ensures even melting and better flavor infusion. European-style butters have higher fat content, which creates a richer, more flavorful coating on the beans.
Garlic Tools
A garlic press saves time and ensures even slices, but a sharp chef’s knife works just as well. For thin slices, place a clove on the flat side of your knife blade and press down firmly.
Avoid mincing—thin slices release aroma without burning. I also keep a microplane handy for quick lemon zest, which adds brightness without overpowering the dish. 🧄
Herb Storage Tips
Fresh herbs like parsley and thyme stay vibrant longer if stored properly. Wrap them in a damp paper towel, place in a resealable plastic bag, and refrigerate for up to 7 days. For thyme, trim the stems and store upright in a glass with water like flowers.
If using dried herbs, measure carefully—dried thyme is 3x stronger than fresh, so use ⅛ tsp instead of ¼ tsp.
Optional Extras
Toasted almonds add crunch, but they require minimal effort. Spread 2 tbsp sliced almonds on a dry skillet over medium heat for 3-4 minutes, stirring constantly, until golden. For a quicker option, pulse them in a food processor for 10-15 seconds to mimic toasted texture.
Red wine vinegar and olive oil are finishing touches—I keep small bottles of both on hand for brightening dishes in seconds. 💫
Pan Care
After cooking, clean your skillet immediately while residual butter is still warm. Use a wooden spatula to scrape off any stuck-on bits, then wash with hot, soapy water and dry thoroughly to prevent rust.
For stubborn residue, sprinkle a pinch of coarse salt while the pan is still warm, scrub gently, then rinse. A well-maintained skillet lasts for years and ensures perfect results every time. ⚡
Nutrition facts
Frequently asked questions
Can I use frozen French green beans instead of canned?
Frozen beans work perfectly—just thaw them first by soaking in cold water for 5 minutes or microwaving for 1 minute. The texture will be slightly firmer than canned, so reduce cooking time to 3 minutes total. Drain well before sautéing to avoid excess moisture in the pan.
Why do my green beans turn mushy?
Overcooking is the most common cause. Canned beans only need 4-5 minutes total in the skillet—check them at 3 minutes to avoid softening. Use medium-high heat and stir frequently. Also, avoid overcrowding the pan; cook in batches if needed to maintain crispness.
What other proteins pair well with this recipe?
This dish complements grilled chicken, pan-seared salmon, or even crispy pork chops beautifully. For a vegetarian option, serve with roasted potatoes or a quinoa salad. The bright garlic-herb flavors cut through rich meats while standing up to lighter plant-based proteins.
Can I make this ahead of time?
Cooked beans keep well for 4 days in the fridge, but texture degrades with reheating. For best results, reheat in a skillet with 1 tsp butter and a splash of water for 2 minutes. Store in an airtight container with a paper towel pressed on top to maintain crispness.
What if I don't have fresh herbs?
Dried herbs work in a pinch—use ⅛ tsp dried thyme (vs ¼ tsp fresh) and 1 tsp dried parsley. For parsley, basil or cilantro also work. The flavor won't be identical, but the dish will still taste delicious.