
Side Dishes
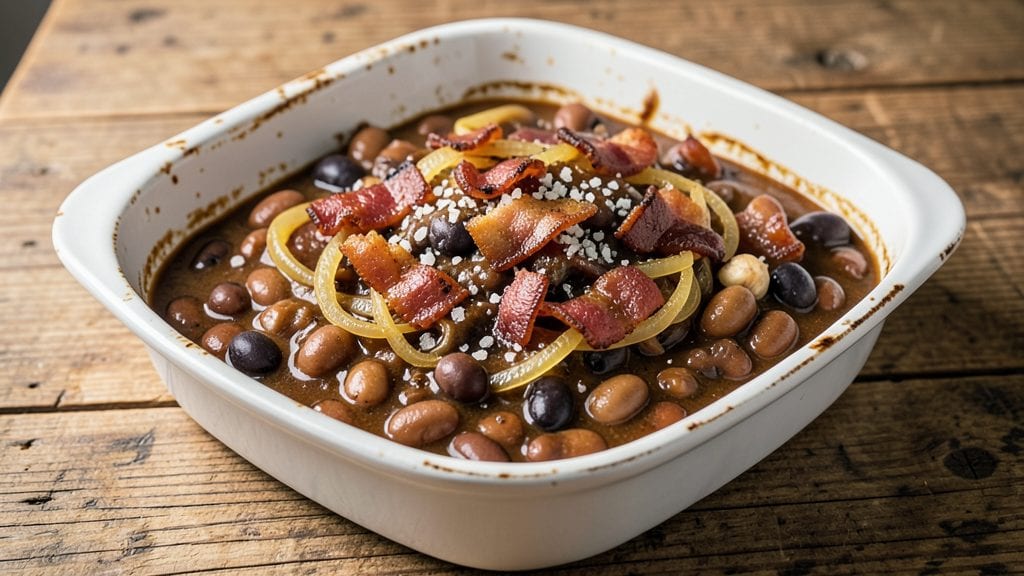
This B&M baked beans copycat recipe delivers the same slow-simmered smokiness and crispy top that made the canned version legendary. 🔥 After years of testing, I’ve cracked the code for replicating that perfect balance of sweet, smoky, and savory flavors at home.
The secret lies in using bacon grease for richness and a long simmer to develop depth.
The key to authenticity is patience—this isn’t something you can rush. You’ll need about 2 hours of simmering time, but every minute transforms tough beans into tender, melt-in-your-mouth bites coated in a glossy, caramelized sauce.
The crispy top comes from a quick broil at the end, giving you that satisfying crunch without sacrificing the soft texture underneath.
What you’ll end up with is a batch of baked beans so rich and flavorful, they’ll fool even the most loyal canned-beans fans. The sauce clings to each bean, offering a perfect mix of smoky bacon, sweet brown sugar, and a hint of tang from molasses.
This is the kind of side dish that elevates any meal—whether you’re serving it alongside BBQ, burgers, or fried chicken.
Ready to make it? This recipe scales perfectly for crowds, and leftovers taste even better the next day. Let’s get started on recreating that iconic flavor profile in your own kitchen.
Ingredients for b&m baked beans copycat
Six ingredients deliver legendary smoky-sweet flavor with that iconic crispy top.
| Ingredient | Amount | Notes |
|---|---|---|
| Navy Beans (Dried) 🍲 | 1 ½ lbs | Soaked overnight for tenderness |
| Bacon 🥓 | 1 lb | Thick-cut preferred for flavor |
| Yellow Onion 🧅 | 1 whole | Medium size, diced |
| Garlic Cloves 🧄 | 6 cloves | Minced for deep flavor |
| Brown Sugar 🍯 | ½ cup | Packed, light kind preferred |
| Molasses 🍯 | ¼ cup | Unsulphured for authentic taste |
| Ketchup 🍅 | ½ cup | Heinz preferred for consistency |
| Mustard 🌶️ | 2 tbsp | Yellow or Dijon |
| Apple Cider Vinegar 🍎 | 2 tbsp | For tangy balance |
| Beef Broth 🥫 | 2 cups | Low-sodium preferred |
| Salt 🧂 | 1 ½ tsp | Kosher or sea salt |
| Black Pepper 🌶️ | ½ tsp | Freshly ground preferred |
| Ground Black Pepper 🌶️ | ½ tsp | For crispy top seasoning |
| Cornstarch 🌾 | 1 tbsp | For sauce thickening |
| Shredded Cheddar Cheese 🧀 | ½ cup | For crispy topping |
The bacon is non-negotiable here—thick-cut from Costco gives the best flavor, but any good-quality bacon works. Look for 100% pork, no fillers—the grease is what makes these taste like the real deal. Navy beans are key; they hold up better than pinto or kidney beans during the long simmer. Bob's Red Mill dried beans are my go-to, but any dried navy beans will do. Soak them overnight in plenty of water—this cuts cooking time and makes them extra tender. The molasses? Unsulphured is a must—sulphured molasses adds a weird chemical taste that ruins the authentic flavor. Grab a small bottle at Trader Joe's if you can't find it at the grocery store.
No molasses? Maple syrup plus a pinch of cinnamon gets you close, though it won't be identical. Short on ketchup? Tomato paste plus a splash of vinegar works, but you'll lose some of that tangy sweetness. The mustard is crucial—Dijon adds depth that regular yellow mustard can't match. For the crispy top, Panko breadcrumbs mixed with cheese work even better than plain cheese alone. The cornstarch is a secret weapon—it thickens the sauce without making it gluey. If you're making this for a crowd, double the cornstarch and cheese for that perfect crunch.
These taste even better the next day—3-4 days in the fridge is perfect. For freezing, portion into airtight containers with a layer of bacon fat on top to preserve moisture. Reheat gently on the stove, stirring often, until warmed through. The crispy top? Broil for 2-3 minutes max—watch it like a hawk or it'll burn. Store any leftover crispy topping separately and sprinkle on fresh when serving. Trust me, the leftovers are where this dish really shines.
Why You'll Love This Recipe
- One-Pot Magic: Honestly, I swear by this—just toss everything in one pot, let it simmer, and walk away. No fancy techniques, no stressing over multiple pans. The beans soften while the bacon renders its smoky magic right into the sauce.
- Smoky-Sweet Bliss: That crispy bacon crunch mixed with caramelized onions and a touch of brown sugar? Dangerously addictive. The garlic cloves roast into the beans, giving it that deep, savory punch that makes you reach for seconds.
- Tailgate Hero: Between us, this is my go-to for game days, potlucks, or lazy Sundays. Serve it with hot dogs, slather it on grilled cheese, or just eat it straight from the pot—it’s the kind of dish that disappears fast.
- Budget-Friendly Staple: Dried navy beans and bacon stretch this recipe for days. I make a big batch on Sundays, and it’s still there for quick weeknight dinners or lunchbox leftovers. Plus, it’s way cheaper than store-bought versions.
Step-by-step instructions for slow-simmered smoky baked beans
Here's how to nail that iconic B&M crispy top and rich, smoky flavor at home.
🔥 Step 1: Cook the Bacon and Sauté Aromatics
Cut the 1 lb bacon into ½-inch pieces and cook in a large Dutch oven over medium heat until crispy, about 8-10 minutes. Use a slotted spoon to remove the bacon and set it aside on paper towels, leaving the rendered fat in the pot. You'll need about 2 tablespoons of that fat for flavor.
In the same Dutch oven, add the diced yellow onion and cook for 5 minutes until softened. Add the 6 minced garlic cloves and cook for another 30 seconds until fragrant. Here's the thing—don't let the garlic burn. It should smell amazing but not bitter. If it starts to darken too quickly, lower the heat slightly.
🍳 Step 2: Build the Flavor Base
Stir in the 0.5 cup brown sugar, 0.25 cup molasses, 0.5 cup ketchup, 2 tbsp mustard, and 2 tbsp apple cider vinegar. Let the mixture bubble for 2-3 minutes until it thickens slightly and the sugars start to caramelize. You'll see it darken and smell like a bakery—this is where all the deep flavor develops.
Pour in the 2 cups beef broth and scrape up any browned bits from the bottom of the pot. These bits are packed with flavor—don't miss this step. Add the 1.5 tsp salt, 0.5 tsp black pepper, and 0.5 tsp ground black pepper, then bring the mixture to a gentle simmer. This is your flavor foundation, so taste it now. You want it sweet, tangy, and slightly smoky.
🥘 Step 3: Simmer the Beans Low and Slow
Add the drained 1.5 lbs soaked navy beans and enough water to cover them by about 1 inch. Bring to a boil, then reduce heat to low and simmer uncovered for 2-2.5 hours until the beans are tender. Stir occasionally, but not constantly—you want to develop that thick, glossy sauce. The beans are done when they're fork-tender and the sauce has reduced to a thick, jammy consistency.
Here's a pro tip: If the beans aren't quite tender after 2 hours, add a little more water and keep simmering. But don't rush this step. The slow cooking is what creates that melt-in-your-mouth texture and deep flavor. You'll know it's ready when the sauce coats the back of a spoon and the beans are soft but not mushy.
⏰ Step 4: Thicken the Sauce and Top with Cheese
In a small bowl, whisk together the 1 tbsp cornstarch with 2 tablespoons water to make a slurry. Stir this into the bean mixture and simmer for another 5-7 minutes until the sauce thickens noticeably. You're looking for a consistency where it coats the beans but still has some body—think thick stew, not glue.
Preheat your broiler to high. Transfer the bean mixture to an oven-safe dish and sprinkle the 0.5 cup shredded cheddar cheese evenly over the top. Pop it under the broiler for 2-3 minutes until the cheese is deep golden brown and bubbly. Watch it closely—you want crispy, not burnt. This crispy cheese topping is what makes these beans legendary.
🍽️ Step 5: Rest and Serve with Bacon
Let the beans rest for 5 minutes before serving. This gives the cheese time to set slightly and the flavors to meld. Stir in the crispy bacon just before serving so it stays crispy. The contrast between the creamy beans, crispy bacon, and cheesy top is what makes these copycat beans so addictive.
Serve immediately with crusty bread or hot dogs for that classic B&M experience. The beans should be rich, slightly sweet, with a deep molasses-ketchup flavor and that perfect crispy cheese crust on top. Each bite delivers smoky, tangy, and savory all at once—just like the original.
Pro Tips For Making B&M Baked Beans Copycat
- CRANK THE HEAT FIRST: Start your beans in a pot of boiling water—yes, even if you’re using dried navy beans. I used to simmer them gently, and they’d turn out mealy. Boiling for the first 10 minutes breaks them down properly, then you can lower the heat to simmer. (Your future self will notice the difference when they hold together.)
- SWEAT THE ONIONS LOW: Don’t rush the onions—cut them into even ¼-inch slices and cook them in bacon fat over low heat for 8-10 minutes. I learned this the hard way after burning them twice; caramelizing them slow builds flavor that cuts through the sweetness later. (Skip the urge to crank the heat—patience here matters.)
- DON’T SKIP THE GARLIC MASH: After mincing the garlic, press it into the pot with the back of a spoon or a fork. This releases more flavor than just tossing it in. I was skeptical until I tried it—I now do this with every garlic-heavy dish. (It’s weird, but it works.)
- SAVE TIME WITH PRE-COOKED BACON: Use pre-cooked bacon (like thick-cut or smoked) instead of frying fresh. Drain it well, chop it, and add it at the end to keep the beans from getting soggy. I skip frying now unless I’m making a big batch—it’s faster and the beans stay firmer. (Your lazy days just got easier.)
Essential equipment for great b&m baked beans copycat
Dutch Oven Essentials
The Dutch oven is your secret weapon for these baked beans—it distributes heat evenly and retains moisture perfectly. I swear by a Lodge 5.5-quart cast iron Dutch oven for its durability and heat retention.
If you don’t have one, a heavy-bottomed stainless steel pot works in a pinch, but it won’t hold heat as well. The deep sides help prevent spills during the long simmer, and the lid keeps flavors concentrated.
Pro tip: Preheat your Dutch oven before adding ingredients to ensure even cooking. 🔥
Slow Cooker Alternative
If you’re short on time (or patience), a 6-quart slow cooker is your best friend for hands-off cooking. Transfer all ingredients to the slow cooker after sautéing the aromatics, then cook on low for 8 hours or high for 4-5 hours.
The slow cooker’s gentle heat mimics the Dutch oven’s even simmer, and you’ll still get that tender, saucy texture. Just skip the crispy cheese top—it won’t hold up under the broiler after slow cooking.
For the crispy finish, broil a fresh batch of cheese separately and sprinkle it on top right before serving.
Broiler Setup
The crispy cheese topping is non-negotiable, so your broiler setup matters. Preheat the broiler to high and position the oven rack 4-5 inches from the heat source for even browning. Use a light-colored metal baking sheet (like a half-sheet pan) to reflect heat upward and avoid hot spots.
Line it with parchment paper for easy cleanup—no one wants to scrub cheese off their broiler pan. If your broiler runs hot, watch the cheese like a hawk—it can go from golden to burnt in seconds. 🌟
Cheese Selection
For that authentic B&M texture, sharp cheddar is your best bet—it melts smoothly yet crisps up beautifully. I recommend Kraft Natural Sharp Cheddar (the kind in the green bag) for its reliable melt and flavor. Avoid pre-shredded cheese—it’s coated with anti-caking agents that prevent proper browning.
If you’re feeling fancy, mix sharp cheddar with a little Monterey Jack for extra creaminess. For a smoky twist, add ½ teaspoon smoked paprika to the cheese before broiling. Trust me, it elevates the dish to next-level deliciousness.
Cornstarch Slurry
Thickening the sauce right is crucial, and a cornstarch slurry is your best tool. Whisk 1 tablespoon cornstarch with 2 tablespoons cold water until smooth—this prevents clumping. Stir it into the simmering beans and cook for 5-7 minutes until the sauce reaches a thick, glossy consistency.
If the sauce thickens too quickly, add a splash of water to loosen it. For a smoother finish, strain the beans through a fine-mesh sieve after thickening, then return them to the pot. This removes any skin or impurities, giving you that silky texture. 💫
Bacon Substitutes
No bacon? No problem. Smoked paprika (1 teaspoon) and liquid smoke (½ teaspoon) mimic the smoky depth, while bacon bits (2 tablespoons) add a salty crunch. For a vegetarian option, temple bacon or mushrooms (sautéed with soy sauce) work surprisingly well.
If you’re using bacon bits, add them at the very end to keep them crispy. The key is balancing the smokiness—taste as you go and adjust with extra molasses or vinegar if needed. Honestly, these substitutes won’t fool a die-hard fan, but they’ll get you close in a pinch.
Nutrition facts
Frequently asked questions
Why do these beans need to simmer for so long?
The long simmer—2-2.5 hours—is what creates that signature tender texture and deep, caramelized flavor. Navy beans need time to break down into creamy perfection, while the slow cooking allows the molasses, sugar, and vinegar to meld into a rich, glossy sauce. Skipping this step means you'll end up with tough beans and a thin, watery sauce.
Can I make these in a slow cooker instead?
Use a 6-quart slow cooker on low for 8 hours or high for 4-5 hours after sautéing the aromatics. Just skip the crispy cheese topping—it won't hold up after slow cooking. For the crispy finish, broil fresh cheese separately and sprinkle it on top right before serving. The slow cooker version is perfect for hands-off cooking and leftovers taste even better the next day.
What if my beans aren't tender after 2 hours?
Don't panic! Add 1 cup hot water and simmer uncovered for another 30-45 minutes. The beans should be fork-tender with a slight resistance—like al dente pasta. If they're still tough, you may need to soak them longer next time. Overcooking can make them mushy, so it's better to err on the side of slightly underdone and let them finish in the sauce.
How do I get the crispy cheese top to work every time?
Broil on high heat with the rack 4-5 inches from the heat source for 2-3 minutes max. Use sharp cheddar (not pre-shredded) and watch like a hawk—it burns fast! For extra crunch, mix the cheese with 1 tbsp cornstarch before broiling. If your oven runs hot, broil in 1-minute intervals until golden brown.
Can I use canned beans instead of dried?
Yes, but the texture won't be identical. Dried beans develop more flavor during the long simmer. If using canned, drain and rinse 2 (15 oz) cans navy beans, then simmer with the sauce for 1 hour to let flavors meld. For best results, add 1 tbsp bacon fat to the pot to compensate for lost richness. The sauce will be thinner, so reduce it longer or add 1 extra tbsp cornstarch.