
Breakfast & Brunch
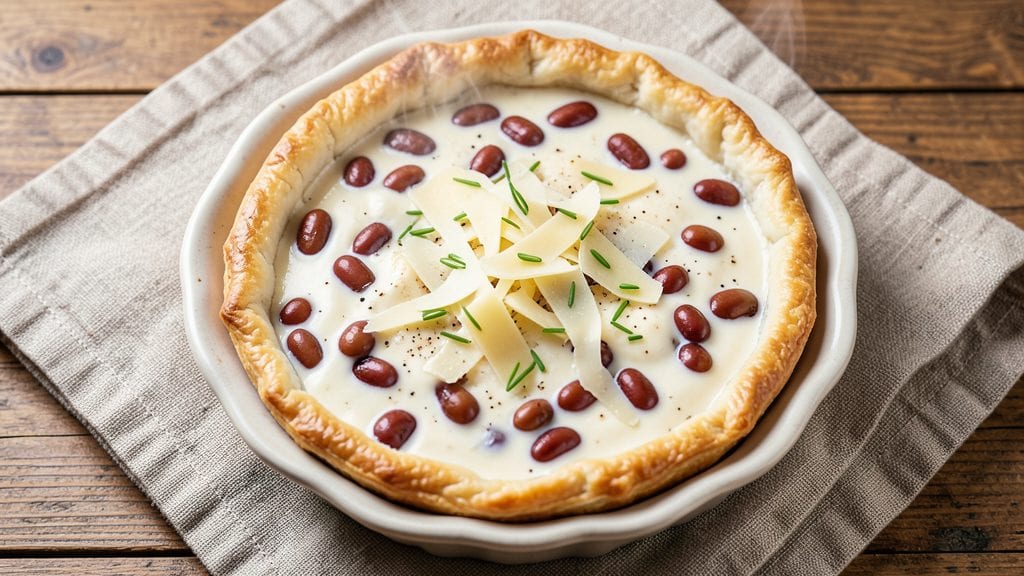
This bean quiche recipe delivers a flaky crust and hearty bean filling that transforms breakfast into a satisfying meal any time of day. The secret lies in a perfectly blind-baked crust that stays crisp while supporting a rich, savory filling of white beans, sharp cheddar, and aromatic herbs.
I developed this version after years of testing—balancing texture and flavor to create a quiche that's both restaurant-worthy and easy enough for weeknight dinners.
The beauty of this recipe is its versatility—whether you use a store-bought crust for convenience or roll out homemade dough for that extra flaky edge, the results are impressive.
The filling combines tender white beans, sharp cheddar, and a touch of mustard for brightness, all bound together by a velvety egg mixture. Baking at the right temperature ensures a golden crust and perfectly set filling, with no soggy centers.
What you'll end up with is a quiche that's hearty enough for brunch but simple enough for lunch—crisp, golden crust giving way to creamy, cheesy bean filling in every bite. The aroma alone will have everyone gathering at your table, and the leftovers keep beautifully for days.
This is the kind of dish that proves homemade can outshine even the best bakery versions.
Serve it with a crisp green salad or crusty bread to soak up every last bit of that rich, savory filling. Ready to make your own perfect bean quiche? Here's everything you need to get started.
Ingredients for bean quiche
Sixteen ingredients for a quiche that's crisp, cheesy, and packed with flavor—no fancy shopping required.
| Ingredient | Amount | Notes |
|---|---|---|
| All-Purpose Flour 🌾 | 2 ½ cups | Spooned and leveled for accuracy |
| Cold Unsalted Butter 🧈 | 1 cup | Cut into small cubes |
| Ice Water 💧 | ½ cup | Chilled for dough consistency |
| Large Eggs 🥚 | 1 whole | For egg wash |
| Canned Cannellini Beans 🫘 | 1 ½ cups | Drained and rinsed well |
| Sharp White Cheddar Cheese 🧀 | 1 ½ cups | Shredded, not pre-shredded |
| Large Eggs 🥚 | 6 whole | Room temperature for filling |
| Heavy Cream 🥛 | 1 cup | Full-fat for richness |
| Dijon Mustard 🍯 | 1 tbsp | For tangy brightness |
| Fresh Chives 🌿 | ¼ cup | Finely chopped for garnish |
| Salt 🧂 | 1 ½ tsp | Kosher or sea salt |
| Black Pepper 🌶️ | ½ tsp | Freshly cracked |
| Dried Thyme 🍃 | 1 tsp | Or 1 tbsp fresh thyme |
| Garlic Powder 🧄 | ½ tsp | For subtle depth |
The crust is where it all begins. Store-bought pie crust works in a pinch, but homemade is worth the effort—especially if you're using a food processor. I grab King Arthur flour for the best texture, and always keep my butter cold. The key? Cutting it into tiny cubes so it distributes evenly. If your dough feels too sticky, add a splash more flour (but don't overdo it). For extra flakiness, I like to freeze the dough for 20 minutes before rolling. The filling's secret? Sharp cheddar—none of that pre-shredded stuff with anti-caking agents. Grab a block and grate it yourself.
No cannellini beans? Great Northern or navy beans work just as well. Running short on chives? Fresh parsley is a great swap—just double the amount. The mustard is non-negotiable for brightness, but if you're avoiding it, a splash of lemon juice gets you close. For the crust, Pillsbury pie crust is a lifesaver on busy mornings. Just brush it with egg wash before baking for that golden finish. And if you're making this ahead, blind-bake the crust first—it's the only way to guarantee that crisp texture. The filling can be prepped a day in advance too, just keep it refrigerated until you're ready to assemble.
This quiche reheats beautifully—just pop it in a 350°F oven for 10-15 minutes until the crust is crisp again. Store leftovers in the fridge for up to 4 days, covered tightly. For freezing, assemble the quiche, then freeze before baking. When you're ready to eat, bake straight from frozen at 375°F for 45-50 minutes. I always make a double batch—one for breakfast, one for lunch. The crust stays crisp even after reheating, and the filling gets even more flavorful as it sits. Perfect for meal prep!
Why You'll Love This Recipe
- No-Pastry Hassle: I swear by this shortcut—just flour, butter, and ice water for the crust. No rolling, no stress, and it still holds up like a dream. (Yes, even when my kids "help" press it down.)
- Creamy Meets Hearty: That mix of eggs and cannellini beans? It’s like a hug in a dish—rich but never heavy, with the beans adding just enough texture to keep it interesting. Honestly, I reach for seconds without guilt.
- Meal Prep MVP: Slice it up and store it for days—no soggy crust here. The beans keep it satisfying for lunch, and the leftovers? Still delicious reheated or cold. (My lunchbox has never been happier.)
- Budget Breakthrough: Canned beans and eggs won’t drain your wallet, but the flavor? It’s restaurant-quality without the markup. Between us, this is how I feed my family well without breaking the bank.
Step-by-step instructions for bean quiche recipe
Here's how to create a perfectly flaky crust and rich bean filling that comes together effortlessly.
Prepare the Flaky Crust
In a large mixing bowl, combine the 2.5 cups all-purpose flour with 1.5 teaspoons salt and 0.5 teaspoon black pepper. Cut in the 1 cup cold unsalted butter using a pastry cutter or your fingers until the mixture resembles coarse crumbs with pea-sized butter pieces. This texture is crucial for achieving that signature flakiness.
Gradually add the 0.5 cup ice water, one tablespoon at a time, mixing gently with a fork until the dough just comes together. Avoid overmixing—just until the dough holds when pressed. Shape into a disk, wrap in plastic, and chill for 30 minutes. The cold dough prevents shrinking and makes rolling easier.
Assemble the Bean Filling
In a separate bowl, whisk together the 6 whole large eggs, 1 cup heavy cream, 1 tablespoon Dijon mustard, 1.5 cups sharp white cheddar cheese (finely shredded), 1 teaspoon dried thyme, and 0.5 teaspoon garlic powder. The mixture should be smooth but slightly thick—this ensures a creamy, cohesive filling.
Drain and rinse the 1.5 cups cannellini beans thoroughly, then fold them into the egg mixture. The beans will add hearty texture while soaking up the rich custard. Taste and adjust seasoning with additional salt or pepper if needed. This step is where the quiche gets its signature bean-packed flavor.
Roll and Line the Crust
On a lightly floured surface, roll out the chilled dough to a 12-inch circle, about 1/8-inch thick. Transfer to a 9-inch pie dish, gently pressing it into the bottom and up the sides to create a snug fit. Trim any excess dough hanging over the edge. The crust should be even to ensure even baking.
Prick the bottom of the crust all over with a fork to prevent puffing. Line the crust with parchment paper, fill with pie weights or dried beans, and bake at 375°F for 15 minutes. This pre-baking step, called blind baking, ensures the crust is fully set before adding the filling.
Bake the Quiche to Perfection
Remove the parchment and weights, then pour the bean filling into the pre-baked crust. The filling should come about 3/4 of the way up the sides. Bake at 375°F for 35-40 minutes, until the center is just set and the top is golden brown. The edges may look slightly underdone, but the residual heat will finish cooking it.
Here's the thing—don't overbake. You want the center to be slightly jiggly when you test it with a knife. The quiche will continue setting as it cools. Let it rest for 10 minutes before slicing to allow the filling to firm up slightly and make serving easier.
Garnish and Serve
While the quiche is still warm, sprinkle the 0.25 cup finely chopped fresh chives evenly over the top. The chives add a bright, fresh contrast to the rich filling and cheese. Let the quiche cool for another 5-10 minutes before slicing into wedges.
Serve warm or at room temperature. The flaky crust should hold its shape, and each bite should deliver a perfect balance of creamy custard, tender beans, and sharp cheddar. This quiche keeps well in the refrigerator for up to 3 days, making it perfect for meal prep.
Pro Tips For Making Bean Quiche
- Preheat Like a Pro: Fire up your oven to 375°F (190°C) before you even think about rolling dough—cold pans slow crust development. I learned this the hard way when my first bean quiche crust turned out more "biscuit" than "flaky." A hot oven is non-negotiable for that perfect golden edge.
- Drain and Pat Beans: Skip the lazy rinse—drain those canned beans, then give them a good pat dry with a towel. Wet beans add moisture to the filling, turning your quiche into a sad, soupy mess. This step takes 30 seconds but makes a real difference in texture.
- Whisk Eggs Cold: Whisk your eggs straight from the fridge—room temp eggs cook unevenly, giving you a rubbery center or overcooked edges. I was skeptical until I tried it; now it’s the thing that matters most for a silky-smooth custard.
- Blind-Bake the Crust: Prick the dough, line it with parchment, and fill with pie weights or dried beans for 15 minutes before adding filling. Without this, your crust will puff up like a balloon and collapse under the weight of the beans and eggs—trust me, I’ve seen it happen. (Yes, even if you’re impatient like me.)
Storing and reheating this recipe
Refrigerator Storage
Store your bean quiche in the refrigerator for up to 4 days in an airtight container—I use glass Pyrex with a tight-sealing lid. The crust stays crisp for the first 2 days, but after that, I recommend reheating to restore its flakiness.
Always let it cool completely before covering to prevent condensation, which can make the crust soggy. 🌡️
Freezer Prep
For longer storage, assemble the quiche completely (including filling) but do not bake it yet. Wrap the unbaked quiche tightly in plastic wrap, then place it in a freezer bag with all the air squeezed out.
Label with the date—it’ll keep for up to 2 months. When ready to bake, transfer straight from the freezer to a 375°F oven for 50-55 minutes.
Oven Reheating
My favorite method is reheating in the oven at 350°F for 10-15 minutes. This restores the crust’s crispness while gently warming the filling. Cover loosely with foil if the top browns too quickly.
For extra crispiness, broil for 1-2 minutes at the end—just watch it closely to avoid burning. 🔥
Microwave Shortcut
For a quick fix, slice a portion and reheat on 50% power for 1-2 minutes. Cover with a damp paper towel to prevent drying. The crust won’t be as crisp, but the filling stays creamy. I only use this method for grab-and-go breakfasts when I’m in a hurry.
Crust Revival Tip
If the crust loses its flakiness after storage, brush it with a little egg wash (1 egg yolk + 1 tbsp water) before reheating. The egg creates a barrier that helps the crust crisp back up.
For extra flair, sprinkle a pinch of garlic powder on top before baking—it adds depth while restoring texture. ✨
Nutrition facts
Frequently asked questions
Can I make this bean quiche without a homemade crust?
A store-bought pie crust works perfectly—just follow the package instructions for pre-baking. I recommend Pillsbury or a high-quality frozen crust for best results. Brush it with egg wash before adding the filling to ensure a golden finish.
What beans work best in this recipe?
Cannellini beans are ideal for their creamy texture, but Great Northern or navy beans work just as well. For extra flavor, try black beans or pinto beans—just increase the seasoning slightly since they have a stronger taste. Drain and rinse them thoroughly before adding to the filling.
Why is my quiche filling rubbery instead of creamy?
Overbaking is the most common cause. The center should be slightly jiggly when done—it will firm up as it cools. Also, ensure your eggs and cream are at room temperature for a smoother texture. If the filling seems too thick, whisk in 1 tablespoon of milk before baking.
Can I make this quiche ahead of time?
Yes! Assemble the quiche (including filling) but don't bake it. Wrap tightly in plastic and refrigerate for up to 24 hours before baking. For longer storage, freeze the unbaked quiche for 2 months. Bake straight from frozen at 375°F for 50-55 minutes.
What's the best way to reheat leftovers?
Oven reheating preserves the crust's crispness best: 350°F for 10-15 minutes. For quick meals, microwave on 50% power for 1-2 minutes (cover with a damp towel). Brush the crust with egg wash before reheating if it loses flakiness.