
Side Dishes
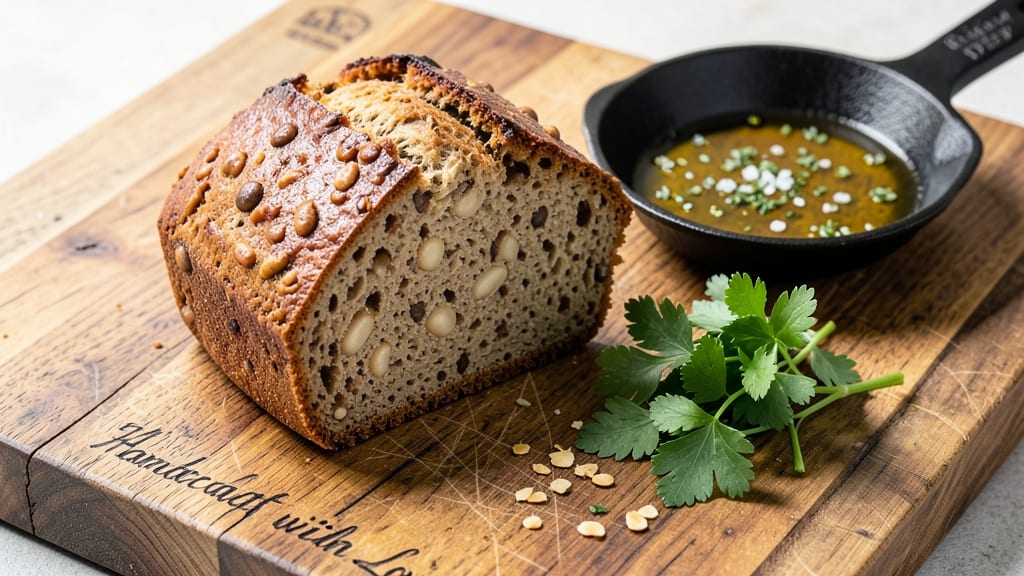
This bean bread recipe transforms humble ingredients into a vegan-friendly, crumbly loaf that requires no traditional binder—just soaked beans, flour, and a few simple pantry staples.
The secret lies in blending cooked beans into a smooth batter that develops a light, airy crumb without eggs or dairy, making it perfect for sandwiches or toast. I developed this recipe after years of experimenting with plant-based baking, and it consistently delivers a texture that rivals commercial bread.
The beauty of this method is its simplicity: no yeast, no kneading, and no specialized equipment. You start with soaked beans blended into a thick paste, then combine with flour, baking powder, and seasonings for a batter that bakes into a golden, slightly dense loaf with a satisfying crunch.
The result is a bread that holds up well for slicing and toasting, yet stays soft enough to enjoy fresh from the oven.
What makes this recipe truly versatile is its adaptability—swap in garlic powder and herbs for a savory loaf, or add cinnamon and sugar for a lightly sweetened variation.
It pairs beautifully with soups, stews, or as the base for open-faced sandwiches, proving that plant-based baking can be both nutritious and delicious without compromise.
Ready in about 50 minutes from start to finish, this bean bread is ideal for meal prep or last-minute gatherings. The instructions are straightforward, and the ingredients are likely already in your pantry, making it a foolproof addition to any kitchen. Let’s get baking!
Ingredients for bean bread
Simple pantry staples create a vegan loaf with no yeast or eggs needed.
| Ingredient | Amount | Notes |
|---|---|---|
| Cooked White Beans 🌱 | 1 ½ cups | Canned, drained, or soaked overnight |
| All-Purpose Flour 🌾 | 2 cups | Unbleached, for optimal texture |
| Baking Powder 🍞 | 2 tsp | Diamond Crystal preferred |
| Salt 🧂 | 1 tsp | Fine sea salt for even distribution |
| Garlic Powder 🧄 | 1 tsp | For savory variation |
| Dried Parsley 🌿 | 1 tsp | For fresh herb flavor |
| Olive Oil 🫒 | 2 tbsp | Extra-virgin for richness |
| Water 💧 | ½ cup | Room temperature for smooth batter |
| Ground Flaxseed 🌾 | 1 tbsp | For subtle nuttiness |
| Apple Cider Vinegar 🍎 | 1 tsp | Activates baking powder |
| Cinnamon 🌿 | ½ tsp | Optional for sweet variation |
| Sugar 🍬 | 1 tbsp | Brown sugar for depth |
The foundation of this recipe lies in the beans—canned white beans save time, but soaked dried beans yield superior texture. For best results, opt for low-sodium brands like Great Northern or Cannellini from the bulk section at Whole Foods or Trader Joe's, where you can also find organic flours for a refined crumb. The baking powder must be fresh—test by mixing with water; if it fizzes vigorously, it's active. Diamond Crystal is the gold standard, but Arm & Hammer works in a pinch. Garlic powder and parsley can be swapped for onion powder and dried thyme for a different savory profile, but keep the ratio identical.
No flaxseed? Chia seeds ground to powder work equally well, though the flavor will differ slightly. Substitute whole wheat flour for up to half the all-purpose flour, but expect a denser result. For those avoiding vinegar, lemon juice activates baking powder just as effectively. The olive oil can be replaced with avocado oil or melted coconut oil, though texture may vary. If your batter seems too thick, add 1 tablespoon of water at a time—this bread thrives on a smooth, pourable consistency before baking. For a sweeter loaf, double the cinnamon and sugar, or add vanilla extract for depth.
This bread stores beautifully in an airtight container at room temperature for 3-4 days, though it's best enjoyed fresh. For longer storage, slice and freeze portions on a tray before transferring to a bag—reheats perfectly in a toaster or oven. The loaf can also be toasted directly from frozen for crispy edges. Portion into single-serving wraps for meal prep, or crumble over salads for added protein. The crumb softens slightly when reheated, making it ideal for open-faced sandwiches or as a side to soups.
Why You'll Love This Recipe
- No-Cook Shortcut: I’ll admit, the first time I made this, I was skeptical—just mash beans, mix with flour, and bake? Turns out, the white beans hold the moisture perfectly, so no need to fuss with extra eggs or buttermilk. Honestly, the dough comes together faster than most cookie recipes, and the texture? Surprisingly light.
- Garlic-Packed Punch: That little pinch of garlic powder isn’t just flavor—it’s the star. The bread has this warm, savory depth that pairs insanely well with soups, charcuterie, or even just butter straight from the fridge. Between us, I’ve seen people take one bite and immediately ask for the recipe.
- Meal Prep MVP: This bread stays fresh for days, so I bake a loaf on Sundays and slice it for toast, sandwiches, or snacking all week. It’s the kind of thing that disappears fast—my kids grab it for lunchboxes, and my husband sneaks slices when he thinks I’m not looking.
- Pantry Staple Magic: Using dried beans instead of canned? Even better—just soak overnight, and boom, you’ve got a budget-friendly base. The baking powder keeps it airy without needing yeast, and the salt and garlic balance everything out. It’s the kind of recipe that makes me feel like I’m cooking fancy, but really, it’s just smart.
Step-by-step instructions for bean bread recipe
This method delivers a uniquely textured bean bread that requires no additional binder—just precise technique.
Prepare the Bean Base
Begin by mashing the 1.5 cups cooked white beans in a food processor until smooth but still slightly textured—think hummus consistency, not puree. This texture is crucial for structure without heaviness. If using canned beans, drain and rinse thoroughly first to remove excess sodium.
Transfer the mashed beans to a mixing bowl and whisk in the 2 tbsp olive oil, 1 tbsp ground flaxseed, 1 tsp apple cider vinegar, and 1 tbsp sugar. The vinegar activates the baking powder later, while the flaxseed adds subtle nuttiness and binds naturally. Let the mixture sit for 5 minutes—this allows the flaxseed to fully hydrate and develop its gelling properties.
Combine Dry Ingredients
In a separate bowl, sift together the 2 cups all-purpose flour, 2 tsp baking powder, 1 tsp salt, 1 tsp garlic powder, 1 tsp dried parsley, and 0.5 tsp cinnamon. Sifting prevents lumps and ensures even distribution of leavening agents. The cinnamon is optional but adds warmth that complements the savory garlic and parsley.
Make a well in the center of the dry ingredients and pour in the bean mixture along with the 0.5 cup room-temperature water. Using a wooden spoon, gently fold everything together until just combined—overmixing develops gluten, which can make the bread dense. The batter should be thick but pourable, resembling thick pancake batter.
Rest and Test the Batter
Cover the bowl with plastic wrap and let the batter rest for 15 minutes at room temperature. This step is critical—it allows the flaxseed to fully activate and the flour to hydrate properly. After resting, the batter should hold its shape when dropped from a spoon but still be smooth.
For a visual test, drop a small spoonful of batter onto a plate. If it holds together but doesn't spread excessively, it's ready. If it's too runny, add 1 tablespoon more flour; if too thick, add 1 teaspoon more water. The goal is a batter that's cohesive enough to hold its shape in the oven but still yields a tender crumb.
Bake for Crumbly Perfection
Preheat your oven to 350°F and line a 9-inch loaf pan with parchment paper for easy removal. Pour the batter into the pan and smooth the top with a spatula. Bake for 45-50 minutes, or until a toothpick inserted in the center comes out clean. The bread should have a golden-brown crust but remain slightly tender inside—this is what gives it the signature crumbly texture.
Real talk: Don't overbake. The bread will continue to set as it cools, and overbaking leads to dryness. When done, transfer the loaf to a wire rack and let it cool completely before slicing. The internal temperature should read 190-195°F at the center when done. The result? A bread with a moist, crumbly interior and a slightly crisp exterior—no eggs, no dairy, just pure bean-based magic.
Pro Tips For Making Bean Bread
- Mash the Beans Thoroughly: I learned this the hard way—lumpy bean bread is a crime. Use a potato masher or fork to break down the beans until they’re smooth, with just a few tiny flecks of texture left. No food processor? That’s fine, but don’t rush it. The goal is a batter that’s thick but pourable—like pancake batter, not chunky refried beans.
- Mix in the Dry Ingredients Last: Dump the flour, baking powder, salt, and garlic powder all at once, then fold just until combined. Overmixing turns bean bread dense and gummy. Stir until the dry bits disappear—maybe 10-12 strokes max—and stop when you see streaks of flour lingering. Your future self will thank you for the lighter crumb.
- Bake Until the Center Reaches 205°F: Bean bread looks done when the top is golden, but the center can stay damp if you pull it too soon. Use an instant-read thermometer—205°F guarantees it’s fully set without drying out. No thermometer? Tap the top: it should sound hollow, not muffled. Underbaked bread stays gummy; overbaked bread turns brick-hard.
- Use Warm Beans Straight from the Pot: Cold beans make for a denser loaf. Scoop them out while still hot (but not boiling) and stir them into the batter immediately. The warmth helps activate the baking powder for better rise. Pro move: Drain them well first—excess liquid makes the bread soggy, no matter how much flour you add.
Make-ahead tips for this bean bread
Prep Ahead Strategy
This bean bread is a meal prep dream because you can prepare the batter up to 24 hours in advance and store it in an airtight container in the fridge. The flavors deepen overnight, and the texture remains perfect when baked fresh.
I like to make the batter the night before so I can bake it straight from the fridge in the morning—just add 5-10 extra minutes to the baking time since cold batter takes longer to set. 📅
Freezer-Friendly Loaves
For long-term storage, bake the bread as directed, then slice it into ½-inch thick pieces and freeze them on a tray lined with parchment paper. Once frozen solid, transfer the slices to a ziplock freezer bag and store for up to 3 months.
To reheat, simply pop a slice in the toaster for 2-3 minutes or warm in a 350°F oven for 5-7 minutes until crispy. The texture stays crumbly and fresh, making it ideal for quick breakfasts or sandwiches. ❄️
Batter Variations
Want to customize your bean bread for different meals? The batter can be divided and flavored before baking. For a herb-loaf, mix in 1 tbsp chopped fresh rosemary or thyme into the wet ingredients.
For a sweet version, replace the garlic powder with 1 tsp cinnamon and ½ tsp nutmeg, then add 2 tbsp maple syrup to the batter. These variations keep well in the fridge for 3 days or can be frozen before baking. 🌿
Portion Control Tips
If you’re prepping for a crowd, bake two loaves at once by doubling the batter and dividing it between two 9-inch loaf pans. For single-serving portions, use a mini loaf pan (5x3 inches)—the batter will yield 4-6 mini loaves, perfect for lunches or snacks.
Store individual portions in small airtight containers to maintain freshness for up to 5 days. This is my go-to trick for office lunches! 💡
Reviving Stale Bread
Even with perfect storage, bean bread can dry out after a few days. To revive it, wrap the loaf tightly in aluminum foil and heat in a 350°F oven for 8-10 minutes. The steam will soften the crumb without making it gummy.
For extra moisture, brush the slices with a little olive oil before toasting. This works like magic for stale bread—no waste, just flavor! 🔥
Batch Baking Schedule
Plan your baking schedule around the 15-minute rest time and 50-minute bake time. If you’re prepping for a week, bake two loaves on Sunday morning—one fresh to enjoy immediately, and one to freeze for later. Label your freezer bags with the date so you can track freshness.
Pro tip: Use a slow cooker or Instant Pot to reheat larger portions if you’re serving a crowd—just cover with water and heat on low for 1-2 hours until warmed through. 🕒
Nutrition facts
Frequently asked questions
Why does this bean bread recipe work without eggs or dairy?
The magic lies in the flaxseed and apple cider vinegar, which act as natural binders and activators for the baking powder. The mashed beans also contribute moisture and structure, while the olive oil adds richness. This combination creates a tender, crumbly loaf that holds together perfectly—no traditional binders needed!
Can I use any type of beans for this recipe?
While white beans (like Great Northern or Cannellini) work best for their mild flavor and smooth texture, you can experiment with black beans or chickpeas for a nuttier taste. Just be sure to drain and rinse them thoroughly if using canned. For a lighter crumb, avoid overly fibrous beans like kidney beans.
How do I fix a dense or gummy bean bread?
Overmixing the batter develops gluten, making the bread dense. If your loaf turns out too heavy, try reducing the flour by 1-2 tablespoons next time. For gummy texture, ensure your baking powder is fresh and don't overbake—remove the bread when a toothpick comes out clean (around 190-195°F internal temp). Let it cool completely before slicing to prevent stickiness.
Is this bean bread gluten-free?
Not as written, but you can easily adapt it! Replace the all-purpose flour with a 1:1 gluten-free baking flour blend (like Bob's Red Mill) and add ½ tsp xanthan gum to improve texture. Keep all other ingredients the same, but expect a slightly denser result. Always test gluten-free flours first in small batches.
Can I make this bread in a different pan shape?
This batter works well in round cake pans, mini loaf pans, or even a cast-iron skillet for a crispy-topped version. For a skillet, bake at 375°F for 20-25 minutes, flipping once. Just adjust baking times—smaller pans need less time, while larger ones may require 5-10 extra minutes**. The texture stays crumbly regardless of shape!