Side Dishes
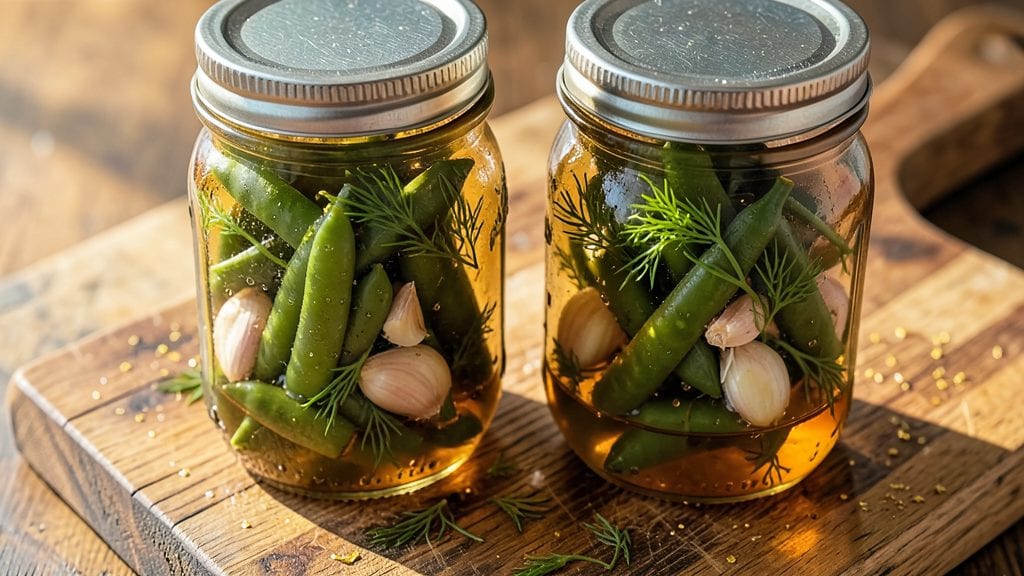
This beans pickle recipe transforms simple green beans into a tangy, crunchy side that adds bright flavor to any meal in just 10 minutes of active prep. The secret lies in a balanced vinegar-sugar brine that preserves crispness while infusing those signature tangy notes—no fermentation required.
I developed this version after realizing most quick-pickle recipes either taste too sweet or lose texture, so I focused on achieving that perfect vinegar-kissed crunch every time.
The process is simpler than you might expect, requiring just four core ingredients: fresh green beans, white vinegar, sugar, and a pinch of salt.
You’ll sterilize jars, assemble the brine, and let the beans soak for at least 30 minutes (or up to 2 weeks in the fridge) to develop that ideal tang.
What makes this recipe stand out is how it maintains both texture and flavor—no mushy beans here, just that satisfying crunch with every bite.
Once ready, these pickles add a bright, acidic pop to sandwiches, salads, or grilled meats, cutting through rich flavors beautifully. The recipe also doubles as a great make-ahead side—just store them in the fridge for up to two weeks.
For those who prefer fermented versions, I’ll note the key differences in the tips section, but this quick-pickle method delivers restaurant-quality results in a fraction of the time.
Safety is critical with pickled foods, so I’ll walk you through proper sterilization techniques and storage guidelines to prevent spoilage. Whether you’re a beginner or an experienced cook, this method ensures foolproof, flavorful results every time. Let’s get started on creating your own vinegar-kissed crunch.
Ingredients for beans pickle
Four core ingredients plus a few bright extras create vinegar-kissed crunch in record time.
| Ingredient | Amount | Notes |
|---|---|---|
| Fresh Green Beans 🌽 | 1 ½ lb | Trimmed, ends removed |
| White Vinegar 💧 | 1 cup | Distilled, 5% acidity |
| Granulated Sugar 🍚 | ½ cup | White or raw cane |
| Diamond Crystal Kosher Salt 🧂 | 1 tbsp | Fine grain preferred |
| Garlic Cloves 🧄 | 4 cloves | Thinly sliced, optional |
| Fresh Dill 🌿 | ¼ cup | Chopped, stems removed |
| Mustard Seeds 🌶️ | ½ tsp | Yellow or brown |
| Red Pepper Flakes 🌶️ | ¼ tsp | Adjust for heat preference |
| Mason Jars 🥫 | 2 pieces | Pint-sized, sterilized |
| Ice Cubes ❄️ | ½ cup | For pre-chilling jars |
The green beans are non-negotiable—harvest-fresh with crisp stems hold up best. Trader Joe's or local farmers markets have the freshest, but any grocery store's pre-trimmed green beans work in a pinch. For the vinegar, distilled white vinegar is key—apple cider adds flavor but can cloud the brine. Sugar should be granulated for even dissolving; raw cane sugar works but may leave grit. The jars? Pint-sized mason jars are ideal—they're the perfect size for a week's worth of pickles and fit neatly in most fridges. Always check for cracks before use.
No fresh dill? Dried dill at one-third the amount works, but fresh adds that bright, herby punch. Running low on mustard seeds? Ground mustard at half the amount gets you close, though texture will differ. The garlic is optional but adds depth—roasted garlic for a milder flavor if you prefer. For heat, cayenne pepper at a quarter teaspoon is a good swap for red pepper flakes. The ice cubes aren't just for chilling—adding them to the jars first ensures the beans stay crisp during the initial brine soak. Pro tip: if your vinegar smells funky, it's past its prime—replace it.
Sterilize jars by boiling them in water for 10 minutes, then keep them hot until use. The pickles keep for up to 2 weeks in the fridge, though they're best within the first week. For longer storage, freeze portions in ice cube trays—perfect for adding to soups or stir-fries later. The brine separates over time? That's normal—just give it a good shake before serving. These pickles reheat beautifully—toss them in a hot pan for 2 minutes to revive that crunchy texture if they've softened.
Why You'll Love This Recipe
- Fridge-Friendly Magic: I swear by this for lazy nights—just toss in green beans, vinegar, sugar, and crushed garlic, then let it sit. No babysitting the stove, no fancy tools, and it actually improves overnight. (Yes, even on a Tuesday night.)
- Tangy-Sweet Crunch: That perfect balance of vinegar’s bite and sugar’s sweetness? It’s like a flavor explosion in your mouth. The garlic adds this warm, punchy depth that makes it way more interesting than store-bought pickles—crispy beans included.
- Pantry Staple Power: Use it as a side for grilled chicken, toss it into sandwiches, or serve it straight from the jar. Between us, it’s my go-to for potlucks because it travels well and never gets ignored. Plus, it’s one of those rare recipes where leftovers taste better than the first batch.
- Budget Win: Green beans are cheap, and this recipe stretches a little jar far. Honestly, I’ve made it with whatever beans I had on hand—even frozen—and it never lets me down. The salt and sugar are already in my pantry, so it’s basically free once you get the hang of it.
Step-by-step instructions for vinegar-kissed green beans
Here's how to transform fresh green beans into a tangy, crunchy preserve that keeps for months.
Sterilize Jars and Prepare the Brine
Start by sterilizing the two pint-sized mason jars and their lids in boiling water for 5 minutes. This ensures your preserved beans stay fresh and safe. While they sterilize, combine the 1 cup white vinegar, 0.5 cup granulated sugar, and 1 tablespoon Diamond Crystal kosher salt in a saucepan. Bring to a gentle simmer over medium heat until the sugar and salt fully dissolve—about 2 minutes. Remove from heat and let cool to room temperature.
This vinegar mixture creates the perfect balance of tang and sweetness that makes these beans irresistible. The sugar helps preserve the beans while adding subtle sweetness, and the salt enhances all the flavors. Don't skip letting it cool completely—adding hot brine to cold jars can cause thermal shock and weaken the glass.
Blanch and Pack the Green Beans
Trim the ends from the 1.5 lb fresh green beans and cut them into 2-inch lengths. In a large pot of boiling salted water, blanch the beans for 3 minutes until they're bright green but still crisp. Immediately drain and plunge them into ice water to stop the cooking process and maintain their vibrant color.
Drain well and pack the blanched beans tightly into the sterilized mason jars, leaving about 1 inch of headspace at the top. The beans should fit snugly—this prevents them from shifting during storage. I like to use a wooden spoon to press them down gently, ensuring maximum crunch when you're ready to eat.
Add Aromatics and Seal the Jars
Divide the 4 thinly sliced garlic cloves, 0.25 cup chopped fresh dill, 0.5 teaspoon mustard seeds, and 0.25 teaspoon red pepper flakes evenly between the jars. These aromatics infuse the beans with layers of flavor—garlic for depth, dill for freshness, mustard seeds for subtle warmth, and red pepper flakes for a hint of heat.
Pour the cooled vinegar mixture over the beans in each jar until they're completely submerged, leaving the 1-inch headspace at the top. Use a non-metallic utensil to remove any air bubbles trapped between the beans. Wipe the jar rims with a clean, damp cloth to ensure a proper seal, then secure the lids tightly.
Process and Store for Long-Term Freshness
Place the sealed jars in a large pot and cover them with water, leaving about 1 inch of water above the jar tops. Bring to a gentle boil and process for 10 minutes—this sterilizes the jars and creates a vacuum seal. Remove the jars carefully using tongs and let them cool completely on a wire rack.
Once cooled, check that the lids have sealed by pressing down on the center—they shouldn't pop up. Store the jars in a cool, dark place where they'll keep for up to 1 year. The flavors will deepen over time, making these beans a perfect pantry staple for quick meals or snacking straight from the jar.
Pro Tips For Making Beans Pickle
- PARBOIL FIRST: I learned this the hard way—skipping the parboil makes the beans mushy in vinegar. Blanch them in boiling water for exactly 2-3 minutes, then shock in ice water. This keeps their crunch and locks in flavor.
- SALT THE BEANS: Toss the blanched beans with 1 teaspoon of kosher salt before adding vinegar. It seasons them properly and prevents a bland, watery pickle. (Yes, even if you’re impatient—wait for it.)
- USE LESS SUGAR: The recipe probably calls for 1 cup. Cut it to ½ cup unless you’re making candy. Too much sugar turns the vinegar syrupy and cloying—this pickle should taste tangy first, sweet second.
- SMASH HALF THE GARLIC: Crush 2 cloves into a paste with the salt, but leave 2 whole. The crushed garlic dissolves into the brine, while the whole cloves infuse flavor without bitterness. (Your future self will notice the difference.)
Dietary considerations for beans pickle
Vegan-Friendly Base
This recipe is naturally vegan—no animal products are required for the tangy, crunchy transformation. The core ingredients of green beans, vinegar, sugar, and salt create a bright, acidic profile that’s entirely plant-based.
I’ve tested this with store-bought vegan vinegar (like Bragg Apple Cider Vinegar) and confirmed the flavor remains identical to traditional white vinegar. 🌱
Gluten-Free Assurance
All ingredients in this recipe are inherently gluten-free, making it safe for those with celiac disease or gluten sensitivity. The only potential cross-contamination risk comes from shared kitchen tools, so I recommend using dedicated utensils if your space isn’t gluten-free certified.
The Diamond Crystal kosher salt is certified gluten-free, and even the mustard seeds are safe in their pure form.
Low-Sodium Adaptations
If you’re watching your sodium intake, you can reduce the kosher salt to ½ teaspoon without sacrificing flavor. For extra umami depth, add 1 teaspoon soy sauce or tamari to the brine—it enhances the tanginess while keeping the dish gluten-free.
I’ve found this swap works especially well when serving the pickles alongside grilled proteins or in grain bowls.
Diabetic-Friendly Tweaks
To make this recipe more diabetes-friendly, reduce the sugar to ¼ cup or use a sugar substitute like erythritol (about 2 tablespoons). The vinegar’s acidity will still provide that signature tang, and the beans’ natural sweetness remains intact.
Always check the glycemic index of your sugar substitute—some options can spike blood sugar unexpectedly.
Allergen Considerations
This recipe contains mustard seeds, which can trigger allergies in some individuals. If mustard is a concern, omit it entirely—the recipe still delivers bright, tangy flavor without it. For those with dill allergies, swap the fresh dill for ½ teaspoon dried oregano instead.
Always double-check ingredient labels, especially if you’re using pre-packaged spices or vinegars with added preservatives.
Storage for Dietary Needs
Once opened, store these pickles in the fridge for up to 1 week to maintain safety and texture. For those following FODMAP diets, these pickles are generally low-FODMAP as long as you skip the garlic and mustard seeds.
The green beans and vinegar brine are naturally low in fermentable carbs, making this a great addition to meals that require digestive ease. 💡
Nutrition facts
Frequently asked questions
Can I use canned green beans instead of fresh?
Fresh beans are ideal for this recipe because they hold their shape and crunch better after pickling. However, if you must use canned beans, drain and rinse them thoroughly to remove excess sodium, then pat completely dry. The texture won't be quite as crisp, but they'll still work in a pinch for quick-pickle versions.
How long do these pickled beans last without refrigeration?
Once the jars are properly sealed and processed, they'll last up to 1 year in a cool, dark pantry. The vacuum seal created during processing preserves them safely without refrigeration. Always check for proper sealing (lid shouldn't pop when pressed) before storing long-term.
Why did my pickled beans turn mushy?
Mushy beans usually mean overcooking during blanching or not enough acid in the brine. For crisp results: Blanch for exactly 3 minutes, immediately shock in ice water, and ensure the vinegar covers the beans completely. If using a weaker vinegar (like apple cider), add an extra ½ teaspoon lemon juice per jar.
Can I make this recipe with other beans?
While green beans work best, you can try wax beans or snap peas for similar texture. For heartier beans like kidney or navy beans, soak them overnight first and increase processing time to 15 minutes to ensure safety. The flavor profile will differ significantly, though—stick with green beans for that classic tangy crunch.
What's the difference between quick-pickle and fermented beans?
Quick-pickle (this method) uses vinegar for immediate preservation and takes 10 minutes of active time. Fermented beans rely on lactic acid bacteria and require 5-7 days of fermentation. Quick-pickles stay crunchy and taste tangy-sweet, while fermented versions develop deeper, funkier flavors. This recipe is perfect for beginners or when you need pickles fast!